Chapter 2 - Getting Started with ChatGPT
2.1. Setting Up Your Development Environment
In this chapter, we will provide you with a comprehensive guide on how to get started with ChatGPT. We understand that starting a new project can be overwhelming, so we've made sure to include all the essential steps to ensure you have a smooth and successful integration process.
First, we'll start by identifying the tools and knowledge you need to effectively utilize this powerful AI language model in your projects. We'll cover the basics of setting up your development environment and integrating the ChatGPT API.
In addition to the basics, we'll also delve into the more advanced features and parameters available to customize your ChatGPT experience. This includes learning how to interact with the ChatGPT API and the various features available to you.
As you progress through this chapter, you'll learn about the intricacies of configuring your development environment, understanding the ChatGPT API, and navigating the different features available to you. We'll offer practical advice and clear examples to make sure you have a complete understanding of ChatGPT.
By the end of this chapter, you'll be well-equipped to harness the capabilities of ChatGPT and begin implementing it into your applications, projects, or business processes. You'll have a deep understanding of the integration process and be able to use ChatGPT to its fullest potential.
Before you can start working with ChatGPT, it is crucial to understand the importance of creating a well-structured development environment. A well-structured development environment ensures that your workflow is optimized, making it easier for you to focus on the task at hand.
The first step towards creating a well-structured development environment is to install the necessary software. This process involves ensuring that you have the correct version of the software and that your system specifications meet the requirements.
Once you have installed the necessary software, the next step is to create an OpenAI API key. An API key is a unique identifier that is used to authenticate requests made to an API. In the case of ChatGPT, the API key is used to access the OpenAI API, which is a critical component of the ChatGPT system.
After creating the API key, the next step is to configure your environment to interact with the ChatGPT API. This process involves ensuring that your API key is correctly configured and that your environment is set up to send and receive requests to and from the ChatGPT API.
In this section, we will walk you through each step in detail, ensuring that your development environment is optimized for seamless integration with ChatGPT. By following these steps, you can be confident that your development environment is set up correctly and that you are ready to start working with ChatGPT.
2.1.1. Installing Required Software
To work with ChatGPT, you will need to have the following software installed on your computer:
Python
ChatGPT is designed to work with Python, a popular programming language for AI and machine learning applications. Make sure you have the latest version of Python installed.
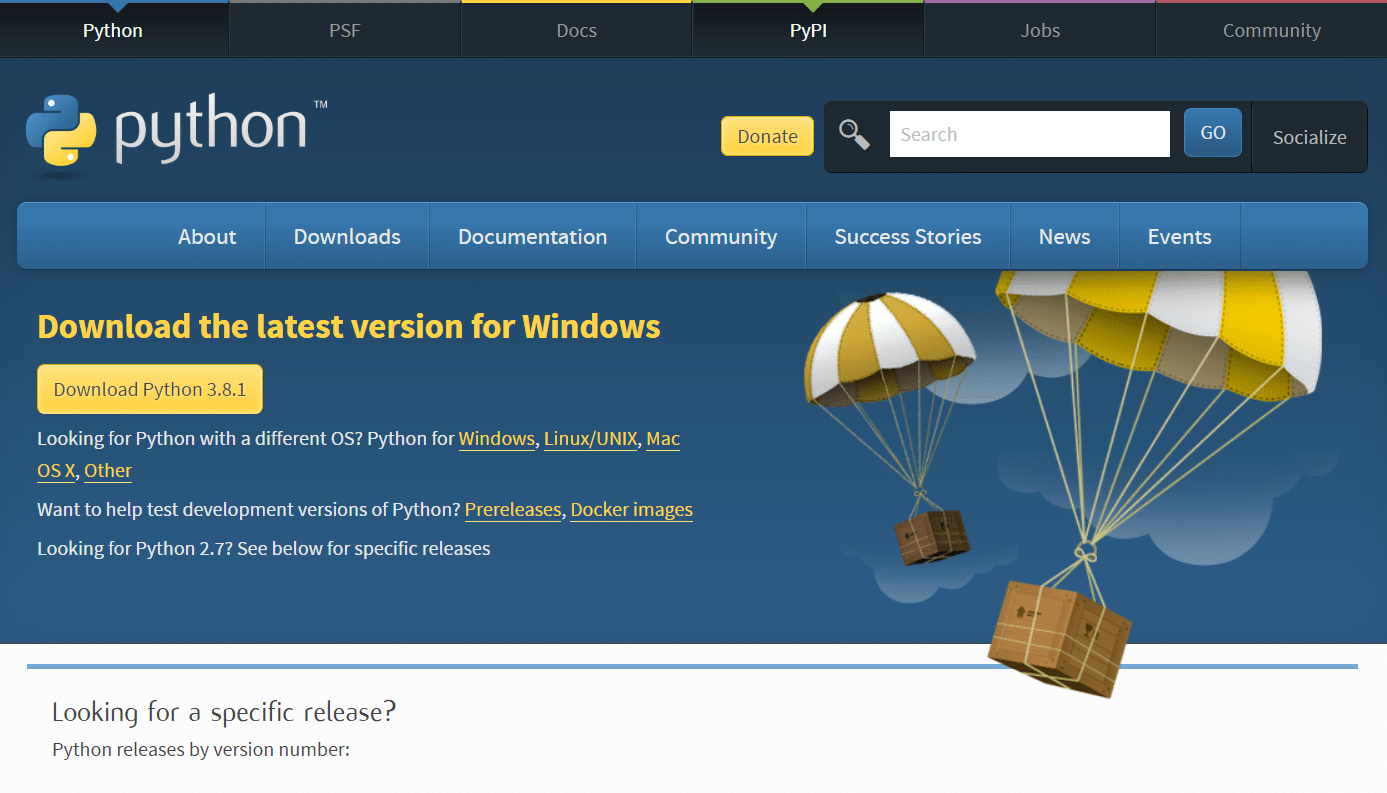
To install Python on your computer follow the following steps:
Step 1: Go to www.python.org
Step 2: Select ‘Downloads’ from the toolbar

Step 3: Click on ‘Download Python 3.8.1’ or the latest version available
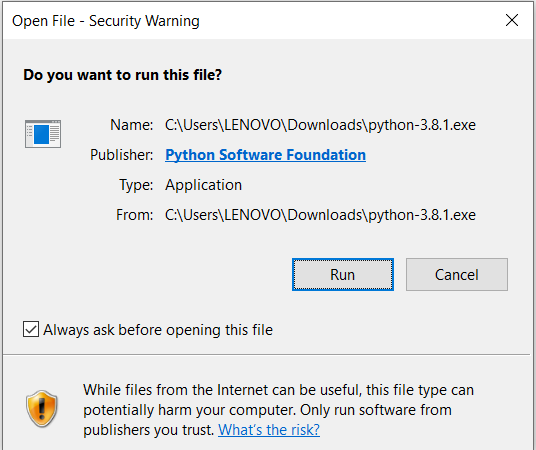
Step 4: Then, go to the File option. After that, a security dialog box will appear as shown below. Click on ‘Run’ to continue the installation process
Step 5: Click on ‘Install Now’
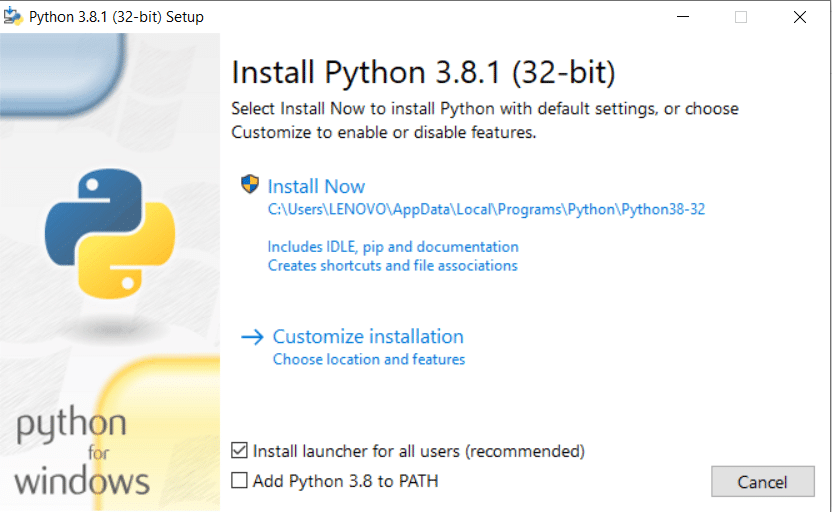
Once you do that, you can see the setup in progress as in the below screenshot:
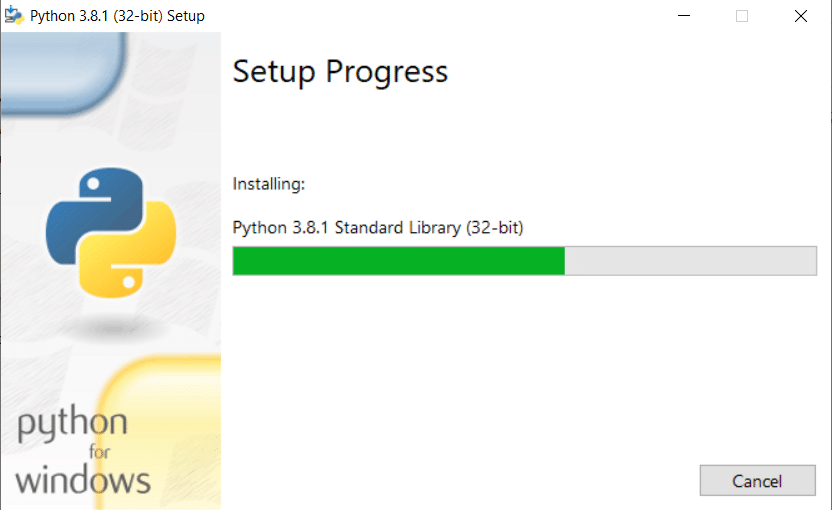
Step 6: After the installation of Python, when you see a window with the message ‘Setup was successful’, click on the ‘Close’ button

Now, you are ready with Python 3.8.1 installed in your system.
Further, we will move on to the installation of PyCharm.
A code editor
A code editor is essential for writing and editing your Python scripts. There are several IDEs and code editors available for Python development. Here, we'll discuss setting up three popular options: PyCharm, Visual Studio Code (VSCode), and Jupyter Notebook.
PyCharm
Step 1: To download PyCharm, visit the official website of JetBrains: http://www.jetbrains.com/pycharm/

Step 2: Click on the ‘Download’’ button
Step 3: After that, you will see the below window with two options, Professional and Community
Step 4: Download the Community version
Note: If you are interested to work with the Professional version, then you can download the Professional version and avail a free trial.

Step 5: After downloading the file, click on it
Step 6: When the following window appears, click on Next and the installation process will start
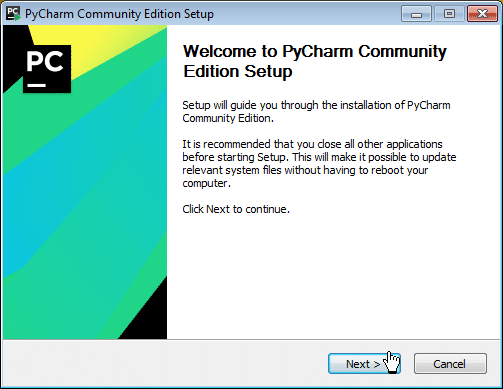
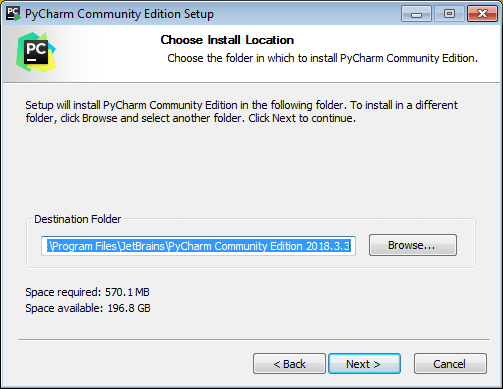
Step 7: After clicking on Next, first, a window for setting up the installation location will appear.
Note: You can either select a folder for the installation location or retain the default path.
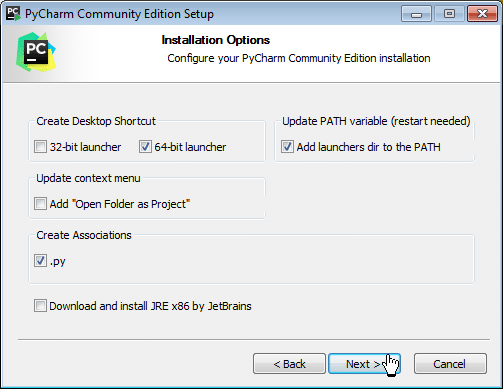
Step 8: In the next step, you can set the Installation Options as per requirements, and then, click on the Next button to proceed
Step 9: Now, you have to select the Start Menu folder, or you can leave it as default
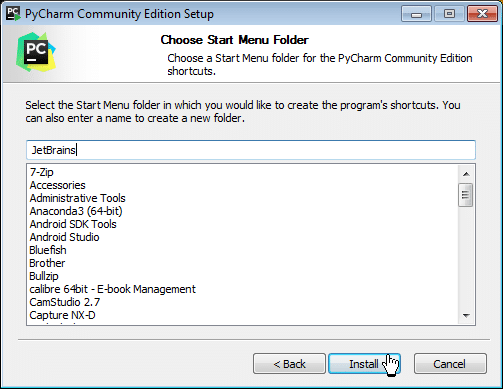
Step 10: After these steps, click on the Install button as above to start the installation process

Step 11: When you click on the Finish button, your PyCharm installation completes
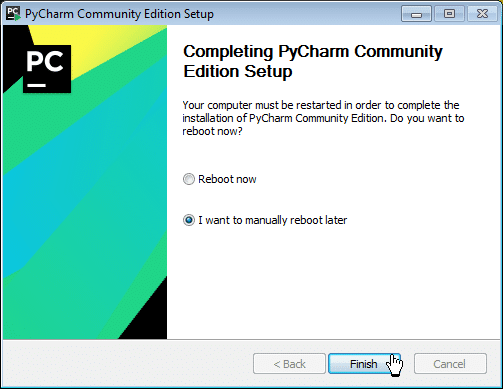
Now, you have successfully installed PyCharm and Python both in your system.
Configuring PyCharm
The first time PyCharm launches, it will offer you the chance to import older settings (from a previous PyCharm installation).
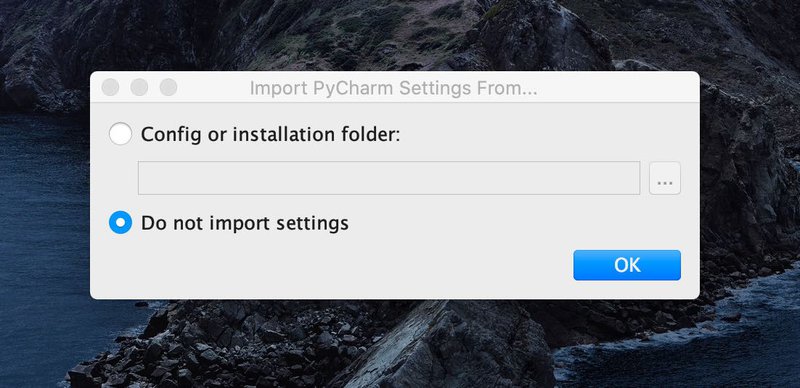
If you are installing PyCharm for the first time, you don't need to import settings. The next screen will ask you to customize PyCharm. The first question is to select a keymap scheme. Keymap scheme refers to keyboard shortcuts, check the different examples in the figure. You can leave it as it if you never used PyCharm before, and it is updated for newer Mac OS versions.
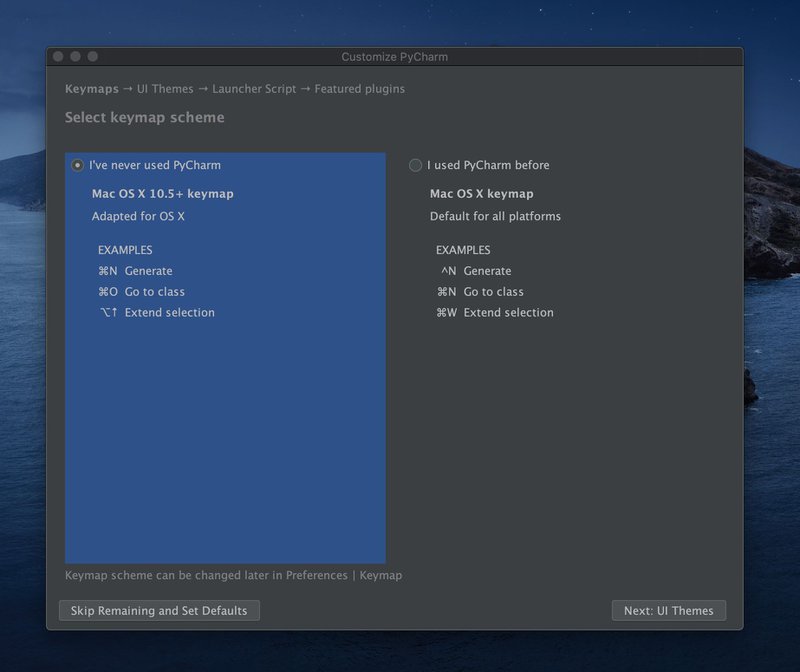
I click on Next: UI Themes. On the following page, I opted for the dark 'Darcula' theme. Don't be disappointed if you don't like any of the themes right now. Later you can add a plugin that allows you to choose between several other beautiful options 😍 (hint: it's a plugin called Material UI Theme). After you chose, click on Next: Launcher Script. A Launcher script adds a small terminal program that can launch PyCharm from your terminal in any given directory. What I mean is that it allows you to do the following:
charm ~/DeveloperProjects/MyNewPythonApplicationIn that line, I am launching PyCharm in the directory called 'MyNewPythonApplication' that is a sub-directory of 'DeveloperProjects.' If you like this feature, check the box. To continue, click on Next: Featured plugins.
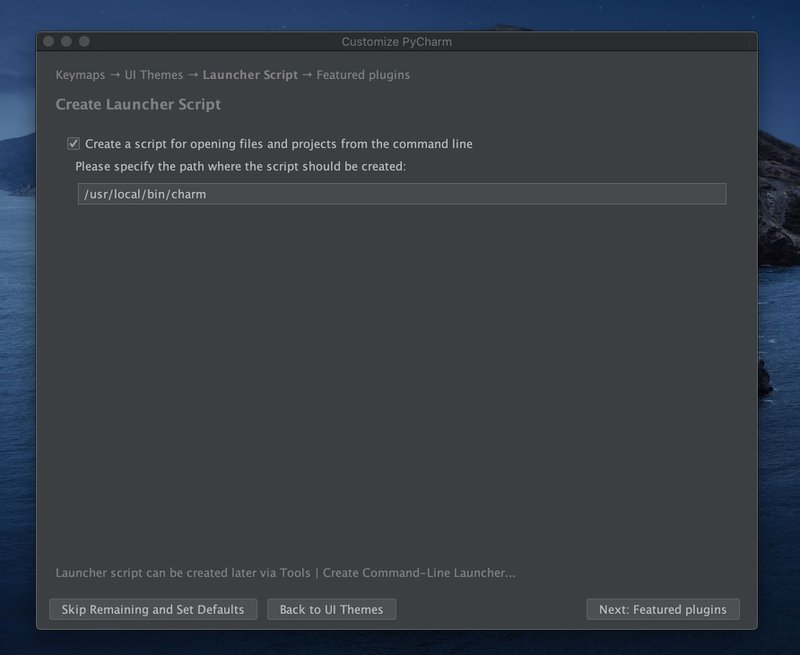
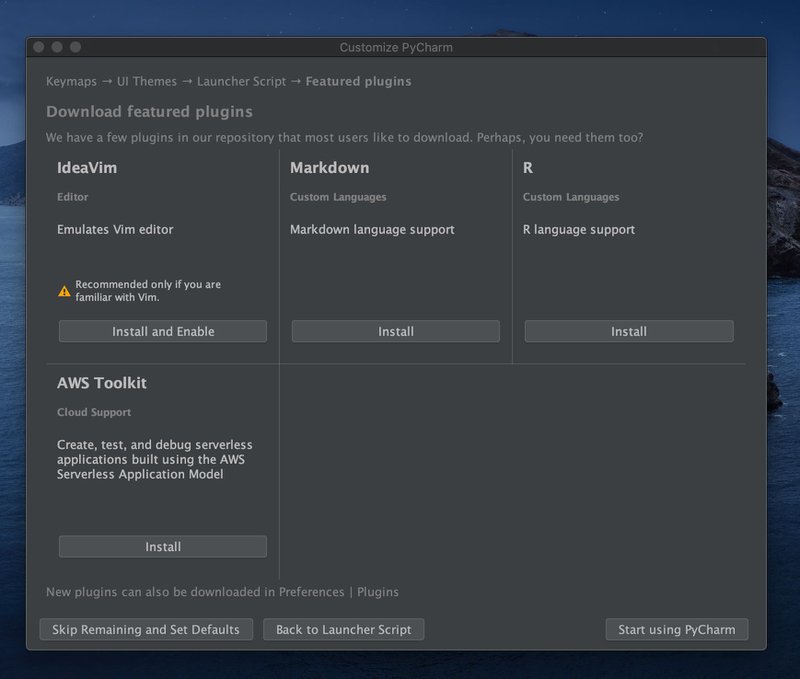
On the next screen, Pycharm suggests popular plugins. That's a personal choice. The configuration is almost ready, now click on Start using PyCharm.
Creating a new project in PyCharm
Now, the next step is to either open an old project (from a repository on your local machine or version control) or create a new project. Let's suppose you want to start a new project. Then, click on + Create New Project.

If you chose the professional version of PyCharm, you can select among several project options from the left sidebar. Or, in case you have the free version, you won't have these options, so you can only open a new Pure Python project. You can create a new project in the same way, though. Chose the location (directory) where you want to save your project.
By clicking on Project Interpreter: New Virtualenv environment, you can choose the environment options for your new project. When you are coding in Python, you will probably make use of several libraries. The environment will hold all the libraries you will install for that project. There are two options 1) New environment or 2) Existing interpreter.
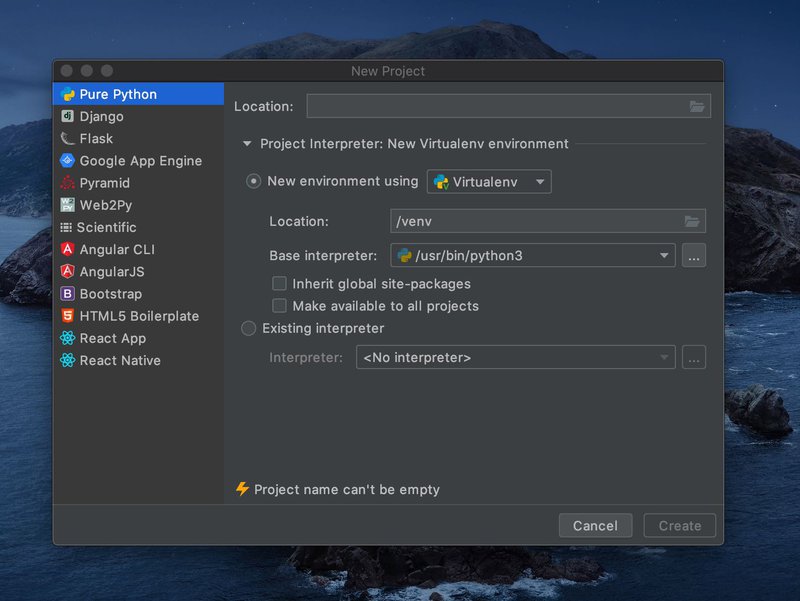
The new environment (first) option gives yet three possibilities, Virtualenv, Pipenv, or Conda. Virtualenv is the default option. Pipenv is newer, and it is supposed to have extra functionalities. To make use of Conda, you need to have installed the Anaconda or Miniconda on your machine. You can use the default Virtualenv. Besides, you can choose the Base interpreter (Python 3 recommended). Click on Create to continue.
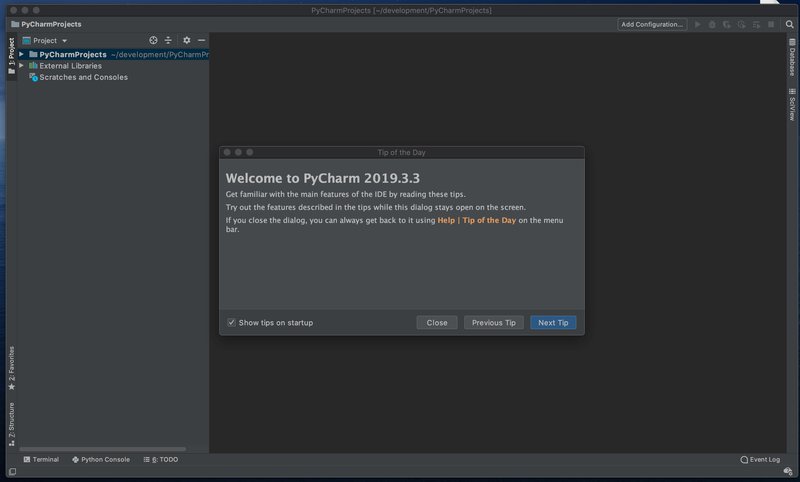
Before you can start coding, PyCharm suggests a 'Tip of the Day' option with tricks on how to increase your productivity by using keyboard shortcuts. If you think you don't need them, you can uncheck this option on the bottom left corner of the pop-up. After that, close the pop-up. Now you can create a new file by clicking Cmd + N (on Mac) or clicking on File > New > File or clicking File > New > Python File (from templates). If you chose the last option, PyCharm will create a file with the .py extension.
You can finally write your code! After you are ready, you can run your script by clicking Run on the main menu (the green arrow on the top right corner) or pressing Ctrl + Option + R on the keyboard. PyCharm offers several features to help you code.
Visual Studio Code (VSCode)
Getting up and running with Visual Studio Code is swift and straightforward. It is a small download so you can install it quickly and give the VS Code a try. VS Code is a free code editor. Additionally, it runs on the macOS, Linux, and Windows operating systems. Let's see how we can set up the same in the different platforms we use.
The first step is shared across all the platforms irrespective of any OS you are using.
Download Visual Studio Code:
You can download Visual Studio code from URL "https://code.visualstudio.com/download" by selecting the right platform:
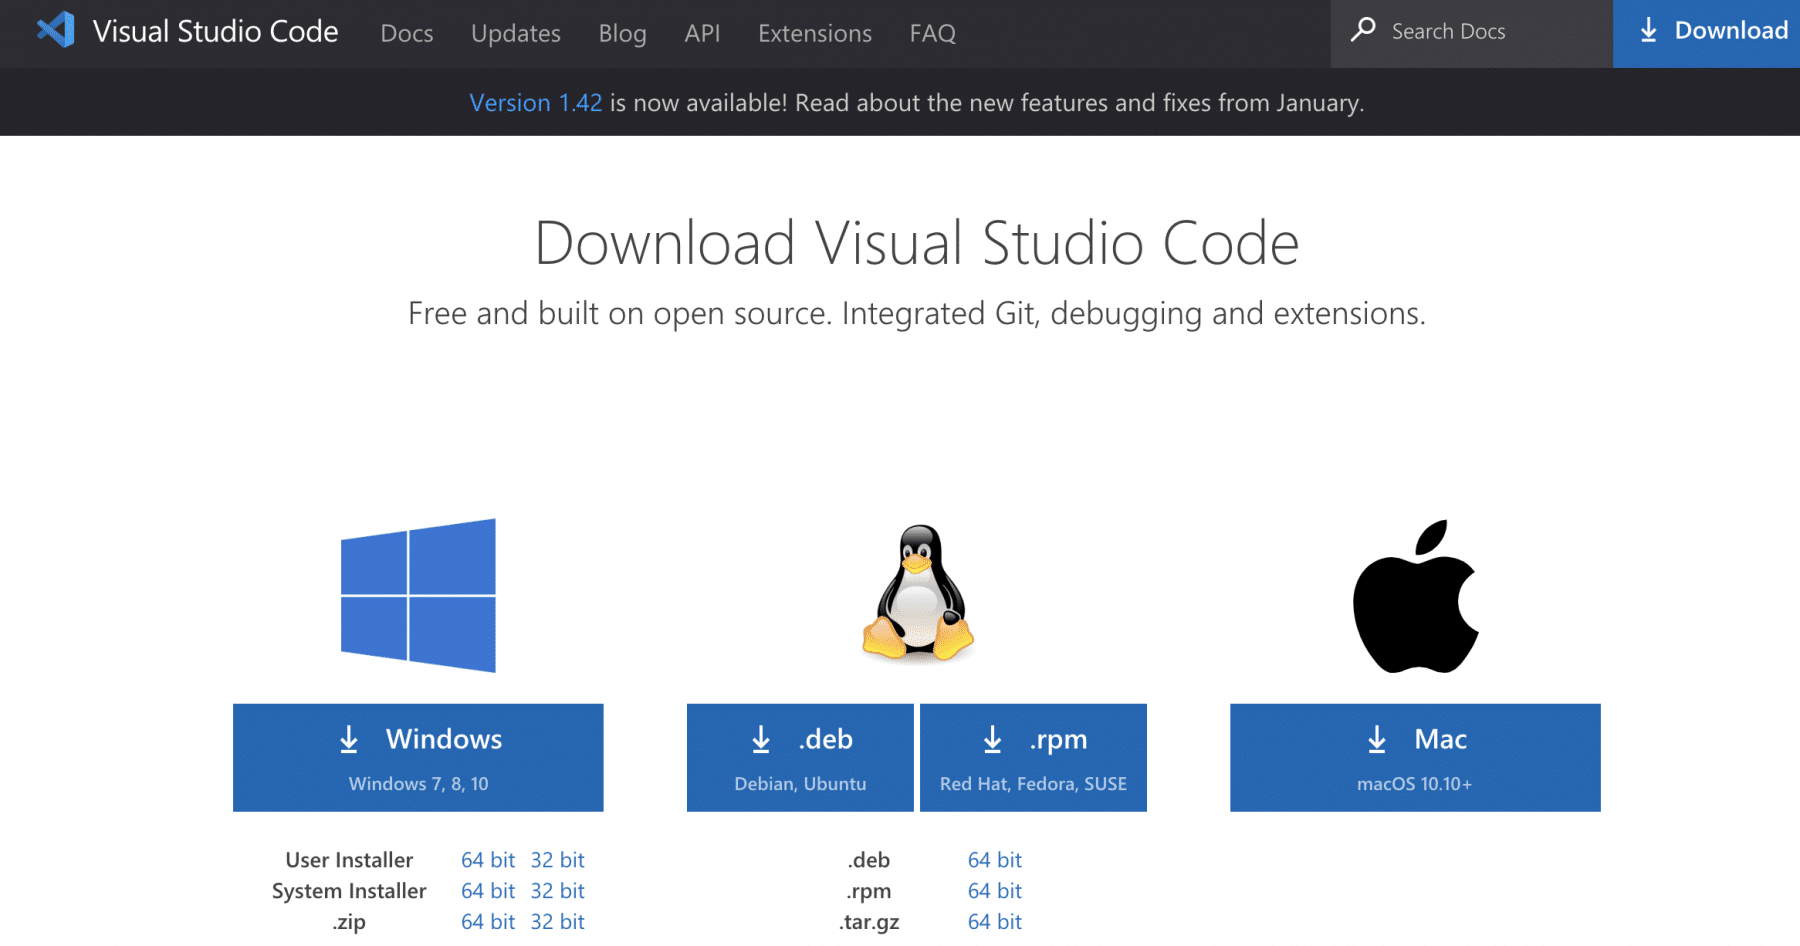
You can click any of the icons mentioned above, depending on the operating system for which you are planning to download the visual studio code editor.
How to install Visual Studio Code on macOS?
Follow the below steps*(shown in gif file and mentioned in bullet points)* to install the VS Code on macOS:
- Download Visual Studio Code for macOS.
- After clicking on the Mac option on the download site, it will download a zip file, as shown below:
- Double-click on the downloaded zip to expand the contents. It will give a file, as shown below:
- Drag "Visual Studio Code.app" to the "Applications" folder, so as it available in the "Launchpad."
- Double click on the "Visual Studio Code" to open.
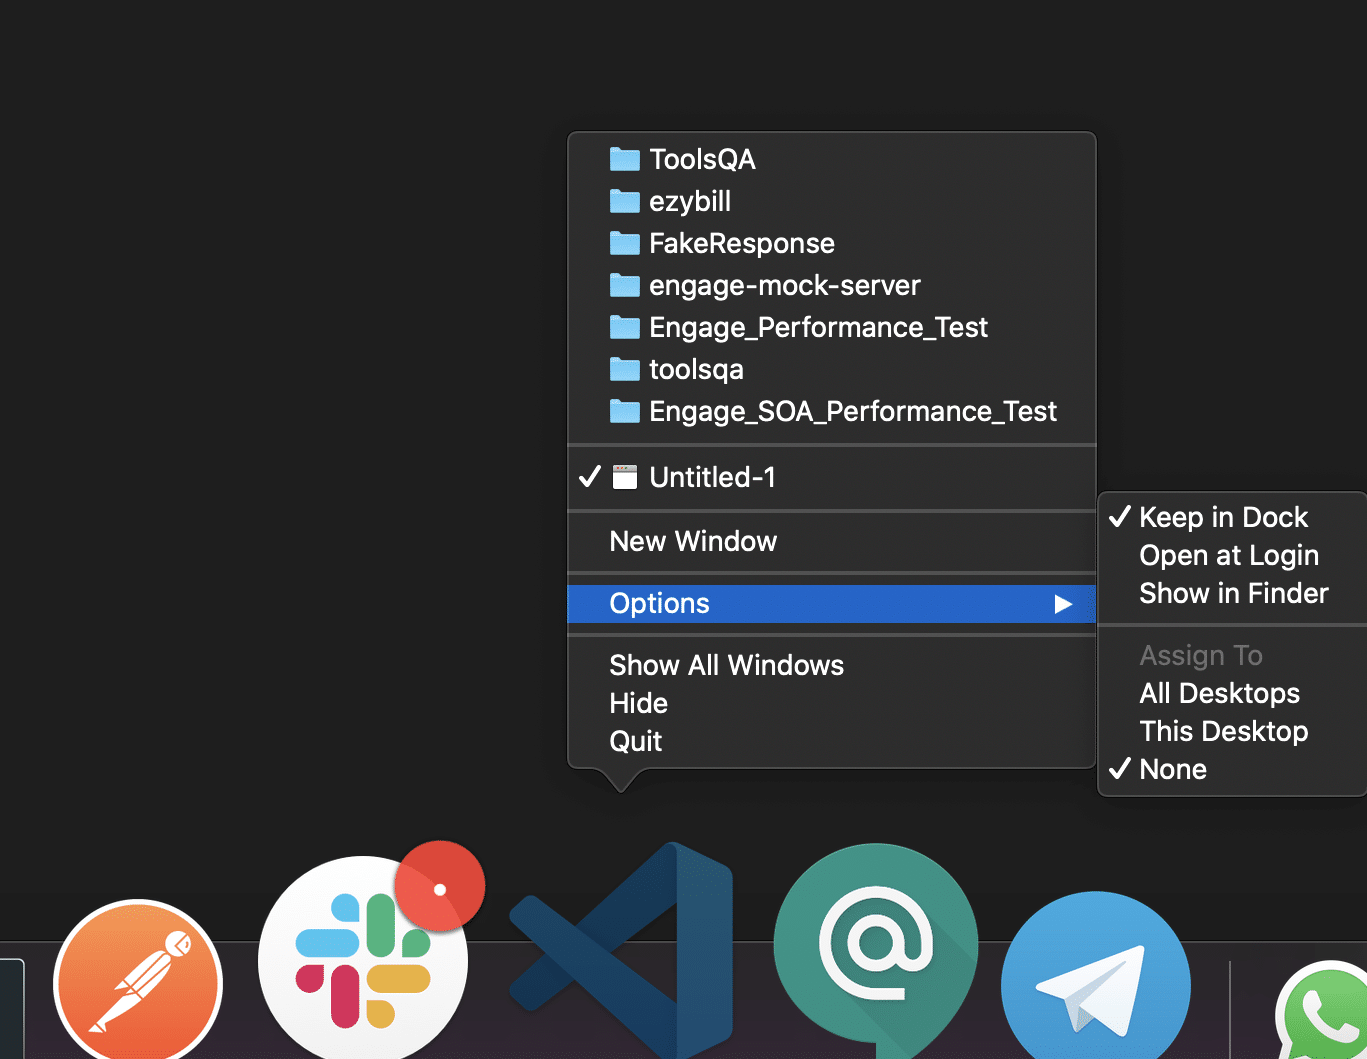
- Add VS Code to your Dock by right-clicking on the icon to bring up the context menu and choosing Options => Keep in Dock.
How to Install Visual Studio Code on Windows?
Firstly, download the Visual Studio Code installer for Windows. Once it is downloaded, run the installer (VSCodeUserSetup-{version}.exe). It will only take a minute.
Secondly, accept the agreement and click on next.
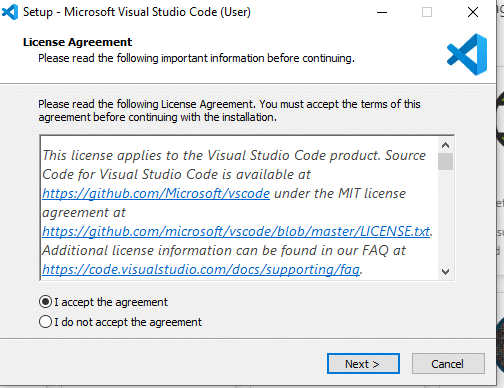
Thirdly, click on "create a desktop icon" so that it can be accessed from desktop and click on Next.
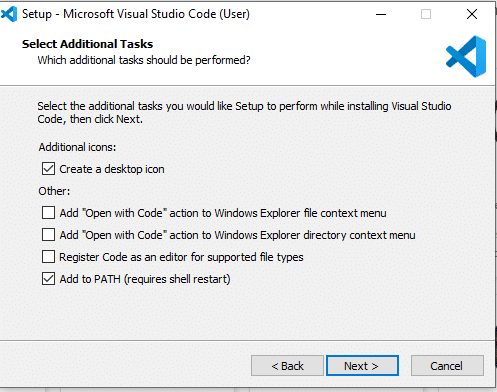
After that, click on the install button.
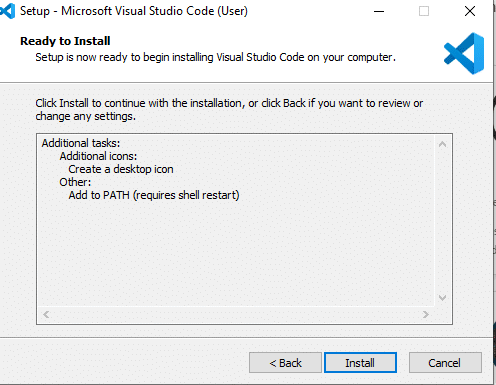
Finally, after installation completes, click on the finish button, and the visual studio code will get open.
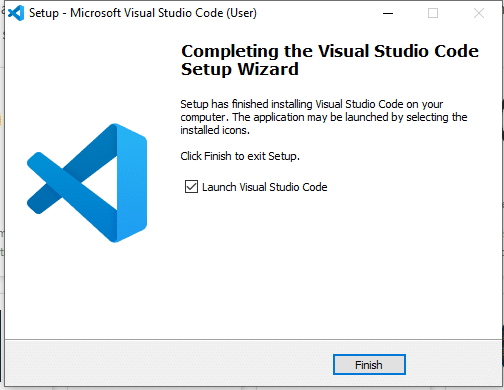
By default, VS Code installs under C:\users{username}\AppData\Local\Programs\Microsoft VS Code.
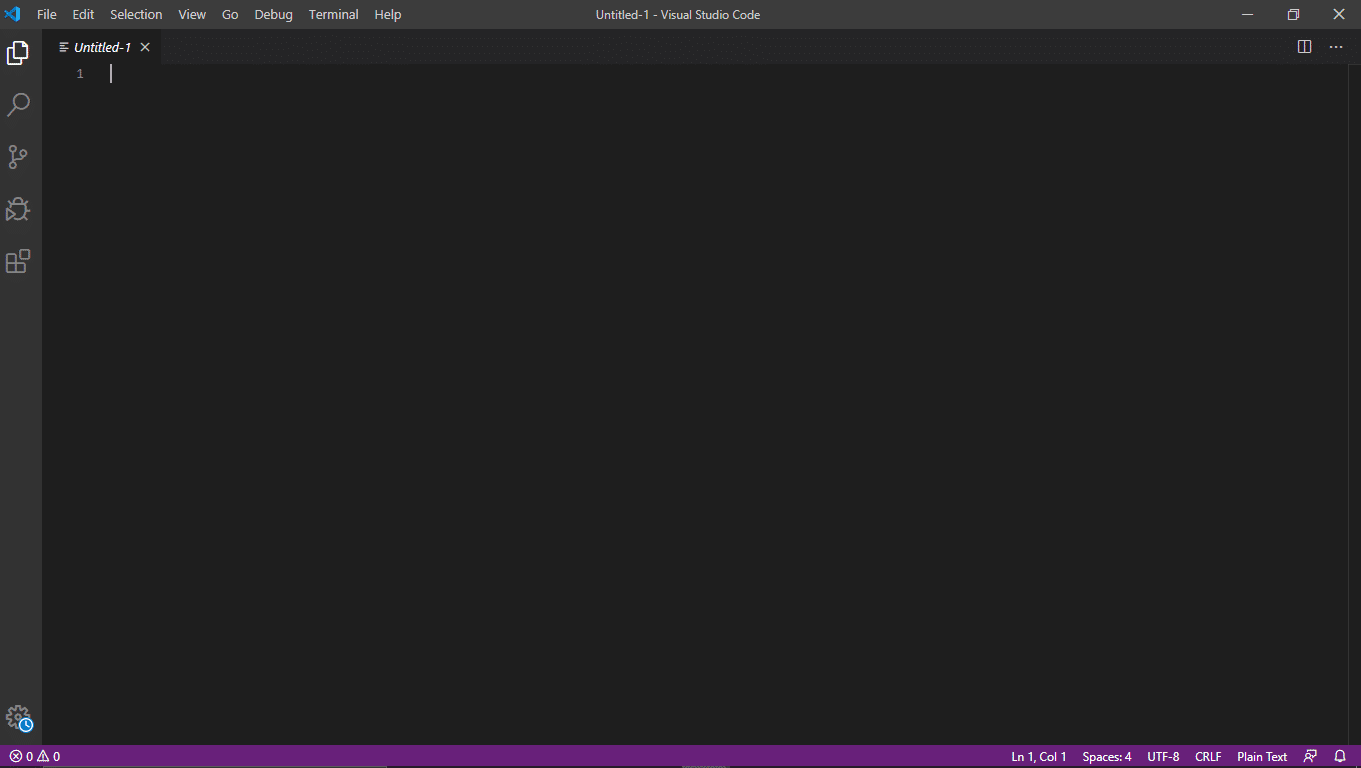
After the successful installation, let's move to the next section to understand the various components of the User Interface of Visual Studio Code Editor.
What are the essential components of the VS Code?
Visual Studio Code is a code editor at its core. Like many other code editors, VS Code adopts a standard user interface and layout of an explorer on the left, showing all of the files and folders you have access to. Additionally, it has an editor on the right, showing the content of the files you have opened. Below are a few of the most critical components the VSCode editor:
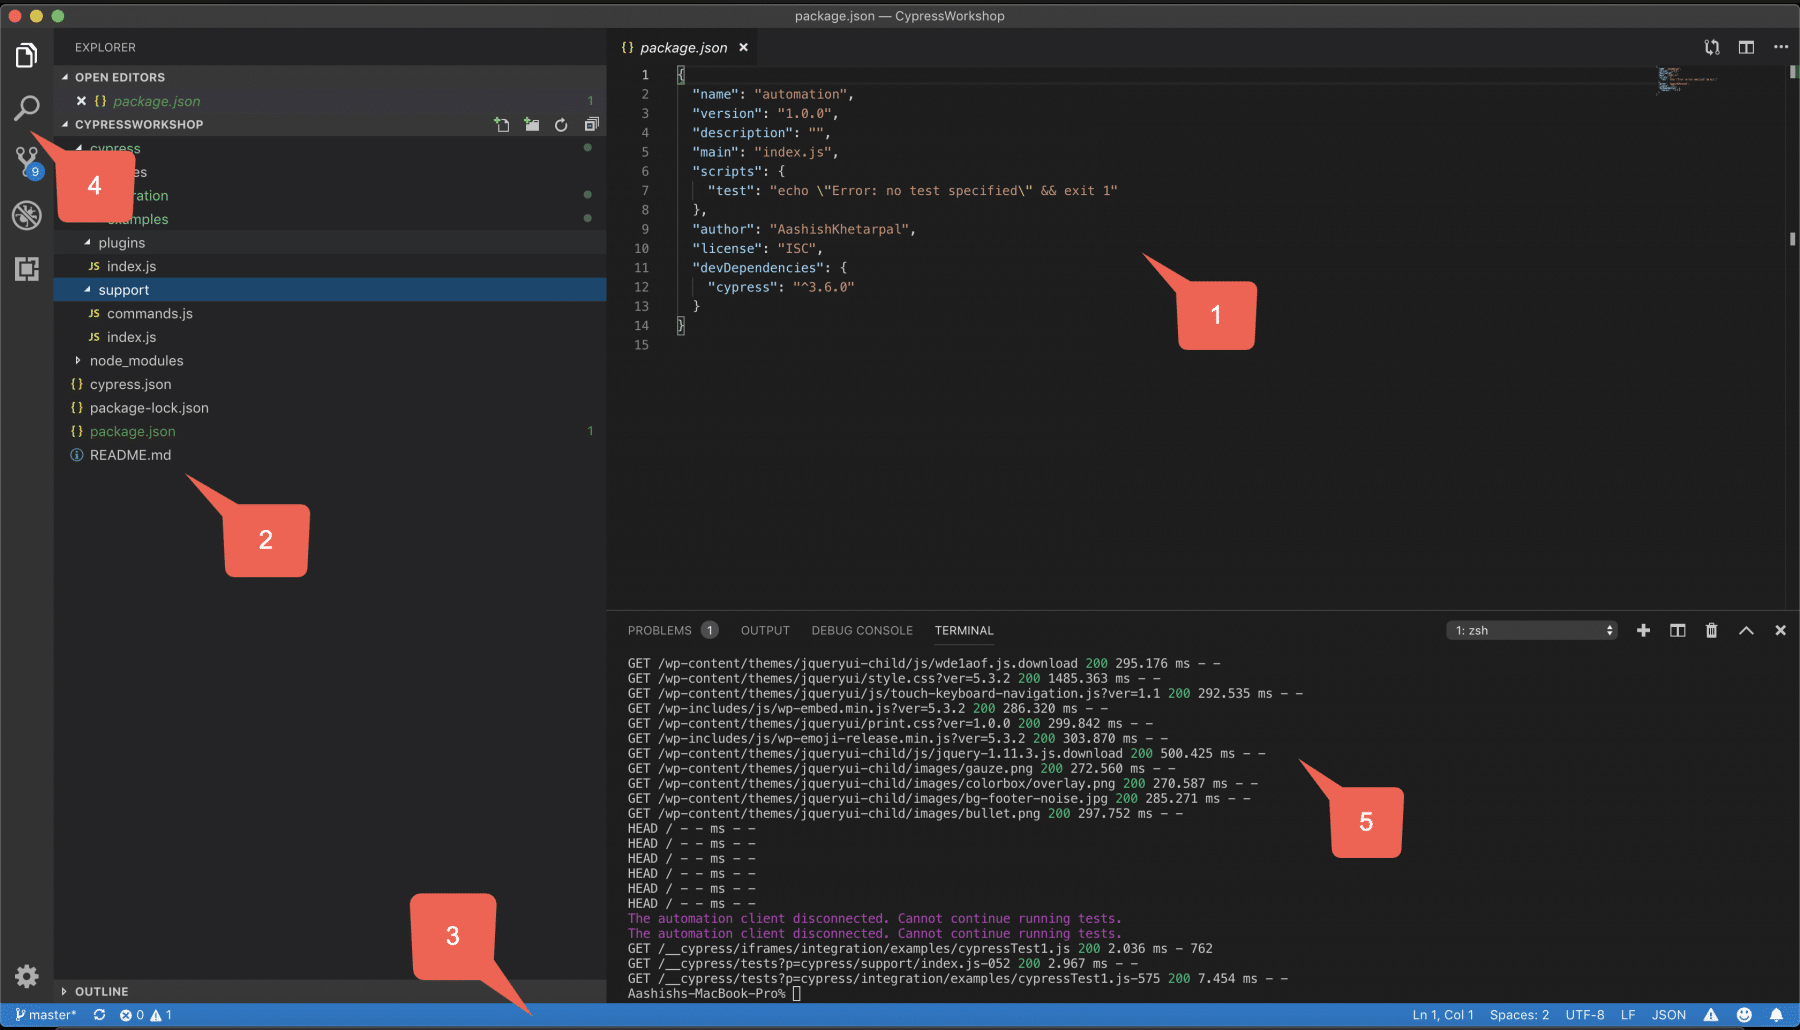
VS Code comes with a straight-forward and intuitive layout that maximizes the space provided for the editor while leaving ample room to browse. Additionally, it allows access to the full context of your folder or project. The UI is divided into five areas, as highlighted in the above image.
- Editor - It is the main area to edit your files. You can open as many editors as possible side by side vertically and horizontally.
- SideBar - Contains different views like the Explorer to assist you while working on your project.
- Status Bar - It contains the information about the opened project and the files you edit.
- Activity Bar - It is located on the far left-hand side. It lets you switch between views and gives you additional context-specific indicators, like the number of outgoing changes when Git is enabled.
- Panels - It displays different panels below the editor region for output or debug information, errors, and warnings, or an integrated terminal. Additionally, the panel can also move to the right for more vertical space.
VS Code opens up in the same state it was last in, every time you start it. It also preserves folder, layout, and opened files.
Jupyter Notebook
- To install Jupyter Notebook, open a command prompt (Windows) or terminal (macOS or Linux) and run the following command:
pip install notebook - Once the installation is complete, launch Jupyter Notebook by running the following command:
jupyter notebookThis will open a new browser window with the Jupyter Notebook interface.
- To create a new Python notebook, click on "New" in the upper-right corner and select "Python 3" (or the appropriate Python version) from the dropdown menu.
- You can now write Python code in the notebook cells and execute them by clicking "Run" or pressing
Shift+Enter. Jupyter Notebook allows you to mix code, text, and multimedia content, making it an excellent tool for interactive data exploration and documentation.
Git (optional)
Git is a widely-used version control system that can help you manage your code and collaborate with other developers. While not strictly necessary for working with ChatGPT, it can be helpful if you plan to work on larger projects or collaborate with a team.
GitHub is a web-based platform that is widely used by developers for version control and collaborative software development. It provides a place for developers to store their code and collaborate with others on a project. GitHub is built on top of Git, which is a distributed version control system that allows developers to keep track of changes made to their code over time.
One of the main benefits of GitHub is its ease of collaboration. Developers can easily share their code with others and work together on a project, regardless of their physical location. This makes it much easier for developers to work together on a project, especially if they are spread out across different locations or time zones.
Another key benefit of GitHub is its powerful version control features. This means that developers can keep track of changes made to their code over time, and easily roll back to a previous version if necessary. This is particularly useful when working on complex projects with multiple developers, where changes to the code can be difficult to keep track of.
GitHub also allows developers to easily share their code with others, and even collaborate on open source projects. This means that developers can contribute to projects that they are interested in, and learn from others in the community.
To get started with GitHub, you'll need to create an account and set up a repository for your project. Once you've done this, you can start adding files and making changes to your code, and collaborate with others on your project. Overall, GitHub is an incredibly useful tool for developers, and is widely used in the industry for collaborative software development.
2.1. Setting Up Your Development Environment
In this chapter, we will provide you with a comprehensive guide on how to get started with ChatGPT. We understand that starting a new project can be overwhelming, so we've made sure to include all the essential steps to ensure you have a smooth and successful integration process.
First, we'll start by identifying the tools and knowledge you need to effectively utilize this powerful AI language model in your projects. We'll cover the basics of setting up your development environment and integrating the ChatGPT API.
In addition to the basics, we'll also delve into the more advanced features and parameters available to customize your ChatGPT experience. This includes learning how to interact with the ChatGPT API and the various features available to you.
As you progress through this chapter, you'll learn about the intricacies of configuring your development environment, understanding the ChatGPT API, and navigating the different features available to you. We'll offer practical advice and clear examples to make sure you have a complete understanding of ChatGPT.
By the end of this chapter, you'll be well-equipped to harness the capabilities of ChatGPT and begin implementing it into your applications, projects, or business processes. You'll have a deep understanding of the integration process and be able to use ChatGPT to its fullest potential.
Before you can start working with ChatGPT, it is crucial to understand the importance of creating a well-structured development environment. A well-structured development environment ensures that your workflow is optimized, making it easier for you to focus on the task at hand.
The first step towards creating a well-structured development environment is to install the necessary software. This process involves ensuring that you have the correct version of the software and that your system specifications meet the requirements.
Once you have installed the necessary software, the next step is to create an OpenAI API key. An API key is a unique identifier that is used to authenticate requests made to an API. In the case of ChatGPT, the API key is used to access the OpenAI API, which is a critical component of the ChatGPT system.
After creating the API key, the next step is to configure your environment to interact with the ChatGPT API. This process involves ensuring that your API key is correctly configured and that your environment is set up to send and receive requests to and from the ChatGPT API.
In this section, we will walk you through each step in detail, ensuring that your development environment is optimized for seamless integration with ChatGPT. By following these steps, you can be confident that your development environment is set up correctly and that you are ready to start working with ChatGPT.
2.1.1. Installing Required Software
To work with ChatGPT, you will need to have the following software installed on your computer:
Python
ChatGPT is designed to work with Python, a popular programming language for AI and machine learning applications. Make sure you have the latest version of Python installed.

To install Python on your computer follow the following steps:
Step 1: Go to www.python.org
Step 2: Select ‘Downloads’ from the toolbar

Step 3: Click on ‘Download Python 3.8.1’ or the latest version available

Step 4: Then, go to the File option. After that, a security dialog box will appear as shown below. Click on ‘Run’ to continue the installation process

Step 5: Click on ‘Install Now’

Once you do that, you can see the setup in progress as in the below screenshot:

Step 6: After the installation of Python, when you see a window with the message ‘Setup was successful’, click on the ‘Close’ button

Now, you are ready with Python 3.8.1 installed in your system.
Further, we will move on to the installation of PyCharm.
A code editor
A code editor is essential for writing and editing your Python scripts. There are several IDEs and code editors available for Python development. Here, we'll discuss setting up three popular options: PyCharm, Visual Studio Code (VSCode), and Jupyter Notebook.
PyCharm
Step 1: To download PyCharm, visit the official website of JetBrains: http://www.jetbrains.com/pycharm/

Step 2: Click on the ‘Download’’ button
Step 3: After that, you will see the below window with two options, Professional and Community
Step 4: Download the Community version
Note: If you are interested to work with the Professional version, then you can download the Professional version and avail a free trial.

Step 5: After downloading the file, click on it
Step 6: When the following window appears, click on Next and the installation process will start

Step 7: After clicking on Next, first, a window for setting up the installation location will appear.
Note: You can either select a folder for the installation location or retain the default path.

Step 8: In the next step, you can set the Installation Options as per requirements, and then, click on the Next button to proceed

Step 9: Now, you have to select the Start Menu folder, or you can leave it as default

Step 10: After these steps, click on the Install button as above to start the installation process

Step 11: When you click on the Finish button, your PyCharm installation completes

Now, you have successfully installed PyCharm and Python both in your system.
Configuring PyCharm
The first time PyCharm launches, it will offer you the chance to import older settings (from a previous PyCharm installation).

If you are installing PyCharm for the first time, you don't need to import settings. The next screen will ask you to customize PyCharm. The first question is to select a keymap scheme. Keymap scheme refers to keyboard shortcuts, check the different examples in the figure. You can leave it as it if you never used PyCharm before, and it is updated for newer Mac OS versions.

I click on Next: UI Themes. On the following page, I opted for the dark 'Darcula' theme. Don't be disappointed if you don't like any of the themes right now. Later you can add a plugin that allows you to choose between several other beautiful options 😍 (hint: it's a plugin called Material UI Theme). After you chose, click on Next: Launcher Script. A Launcher script adds a small terminal program that can launch PyCharm from your terminal in any given directory. What I mean is that it allows you to do the following:
charm ~/DeveloperProjects/MyNewPythonApplicationIn that line, I am launching PyCharm in the directory called 'MyNewPythonApplication' that is a sub-directory of 'DeveloperProjects.' If you like this feature, check the box. To continue, click on Next: Featured plugins.

On the next screen, Pycharm suggests popular plugins. That's a personal choice. The configuration is almost ready, now click on Start using PyCharm.

Creating a new project in PyCharm
Now, the next step is to either open an old project (from a repository on your local machine or version control) or create a new project. Let's suppose you want to start a new project. Then, click on + Create New Project.

If you chose the professional version of PyCharm, you can select among several project options from the left sidebar. Or, in case you have the free version, you won't have these options, so you can only open a new Pure Python project. You can create a new project in the same way, though. Chose the location (directory) where you want to save your project.
By clicking on Project Interpreter: New Virtualenv environment, you can choose the environment options for your new project. When you are coding in Python, you will probably make use of several libraries. The environment will hold all the libraries you will install for that project. There are two options 1) New environment or 2) Existing interpreter.

The new environment (first) option gives yet three possibilities, Virtualenv, Pipenv, or Conda. Virtualenv is the default option. Pipenv is newer, and it is supposed to have extra functionalities. To make use of Conda, you need to have installed the Anaconda or Miniconda on your machine. You can use the default Virtualenv. Besides, you can choose the Base interpreter (Python 3 recommended). Click on Create to continue.

Before you can start coding, PyCharm suggests a 'Tip of the Day' option with tricks on how to increase your productivity by using keyboard shortcuts. If you think you don't need them, you can uncheck this option on the bottom left corner of the pop-up. After that, close the pop-up. Now you can create a new file by clicking Cmd + N (on Mac) or clicking on File > New > File or clicking File > New > Python File (from templates). If you chose the last option, PyCharm will create a file with the .py extension.
You can finally write your code! After you are ready, you can run your script by clicking Run on the main menu (the green arrow on the top right corner) or pressing Ctrl + Option + R on the keyboard. PyCharm offers several features to help you code.
Visual Studio Code (VSCode)
Getting up and running with Visual Studio Code is swift and straightforward. It is a small download so you can install it quickly and give the VS Code a try. VS Code is a free code editor. Additionally, it runs on the macOS, Linux, and Windows operating systems. Let's see how we can set up the same in the different platforms we use.
The first step is shared across all the platforms irrespective of any OS you are using.
Download Visual Studio Code:
You can download Visual Studio code from URL "https://code.visualstudio.com/download" by selecting the right platform:

You can click any of the icons mentioned above, depending on the operating system for which you are planning to download the visual studio code editor.
How to install Visual Studio Code on macOS?
Follow the below steps*(shown in gif file and mentioned in bullet points)* to install the VS Code on macOS:
- Download Visual Studio Code for macOS.
- After clicking on the Mac option on the download site, it will download a zip file, as shown below:
- Double-click on the downloaded zip to expand the contents. It will give a file, as shown below:
- Drag "Visual Studio Code.app" to the "Applications" folder, so as it available in the "Launchpad."
- Double click on the "Visual Studio Code" to open.
- Add VS Code to your Dock by right-clicking on the icon to bring up the context menu and choosing Options => Keep in Dock.

How to Install Visual Studio Code on Windows?
Firstly, download the Visual Studio Code installer for Windows. Once it is downloaded, run the installer (VSCodeUserSetup-{version}.exe). It will only take a minute.
Secondly, accept the agreement and click on next.

Thirdly, click on "create a desktop icon" so that it can be accessed from desktop and click on Next.

After that, click on the install button.

Finally, after installation completes, click on the finish button, and the visual studio code will get open.

By default, VS Code installs under C:\users{username}\AppData\Local\Programs\Microsoft VS Code.

After the successful installation, let's move to the next section to understand the various components of the User Interface of Visual Studio Code Editor.
What are the essential components of the VS Code?
Visual Studio Code is a code editor at its core. Like many other code editors, VS Code adopts a standard user interface and layout of an explorer on the left, showing all of the files and folders you have access to. Additionally, it has an editor on the right, showing the content of the files you have opened. Below are a few of the most critical components the VSCode editor:

VS Code comes with a straight-forward and intuitive layout that maximizes the space provided for the editor while leaving ample room to browse. Additionally, it allows access to the full context of your folder or project. The UI is divided into five areas, as highlighted in the above image.
- Editor - It is the main area to edit your files. You can open as many editors as possible side by side vertically and horizontally.
- SideBar - Contains different views like the Explorer to assist you while working on your project.
- Status Bar - It contains the information about the opened project and the files you edit.
- Activity Bar - It is located on the far left-hand side. It lets you switch between views and gives you additional context-specific indicators, like the number of outgoing changes when Git is enabled.
- Panels - It displays different panels below the editor region for output or debug information, errors, and warnings, or an integrated terminal. Additionally, the panel can also move to the right for more vertical space.
VS Code opens up in the same state it was last in, every time you start it. It also preserves folder, layout, and opened files.
Jupyter Notebook
- To install Jupyter Notebook, open a command prompt (Windows) or terminal (macOS or Linux) and run the following command:
pip install notebook - Once the installation is complete, launch Jupyter Notebook by running the following command:
jupyter notebookThis will open a new browser window with the Jupyter Notebook interface.
- To create a new Python notebook, click on "New" in the upper-right corner and select "Python 3" (or the appropriate Python version) from the dropdown menu.
- You can now write Python code in the notebook cells and execute them by clicking "Run" or pressing
Shift+Enter. Jupyter Notebook allows you to mix code, text, and multimedia content, making it an excellent tool for interactive data exploration and documentation.
Git (optional)
Git is a widely-used version control system that can help you manage your code and collaborate with other developers. While not strictly necessary for working with ChatGPT, it can be helpful if you plan to work on larger projects or collaborate with a team.
GitHub is a web-based platform that is widely used by developers for version control and collaborative software development. It provides a place for developers to store their code and collaborate with others on a project. GitHub is built on top of Git, which is a distributed version control system that allows developers to keep track of changes made to their code over time.
One of the main benefits of GitHub is its ease of collaboration. Developers can easily share their code with others and work together on a project, regardless of their physical location. This makes it much easier for developers to work together on a project, especially if they are spread out across different locations or time zones.
Another key benefit of GitHub is its powerful version control features. This means that developers can keep track of changes made to their code over time, and easily roll back to a previous version if necessary. This is particularly useful when working on complex projects with multiple developers, where changes to the code can be difficult to keep track of.
GitHub also allows developers to easily share their code with others, and even collaborate on open source projects. This means that developers can contribute to projects that they are interested in, and learn from others in the community.
To get started with GitHub, you'll need to create an account and set up a repository for your project. Once you've done this, you can start adding files and making changes to your code, and collaborate with others on your project. Overall, GitHub is an incredibly useful tool for developers, and is widely used in the industry for collaborative software development.
2.1. Setting Up Your Development Environment
In this chapter, we will provide you with a comprehensive guide on how to get started with ChatGPT. We understand that starting a new project can be overwhelming, so we've made sure to include all the essential steps to ensure you have a smooth and successful integration process.
First, we'll start by identifying the tools and knowledge you need to effectively utilize this powerful AI language model in your projects. We'll cover the basics of setting up your development environment and integrating the ChatGPT API.
In addition to the basics, we'll also delve into the more advanced features and parameters available to customize your ChatGPT experience. This includes learning how to interact with the ChatGPT API and the various features available to you.
As you progress through this chapter, you'll learn about the intricacies of configuring your development environment, understanding the ChatGPT API, and navigating the different features available to you. We'll offer practical advice and clear examples to make sure you have a complete understanding of ChatGPT.
By the end of this chapter, you'll be well-equipped to harness the capabilities of ChatGPT and begin implementing it into your applications, projects, or business processes. You'll have a deep understanding of the integration process and be able to use ChatGPT to its fullest potential.
Before you can start working with ChatGPT, it is crucial to understand the importance of creating a well-structured development environment. A well-structured development environment ensures that your workflow is optimized, making it easier for you to focus on the task at hand.
The first step towards creating a well-structured development environment is to install the necessary software. This process involves ensuring that you have the correct version of the software and that your system specifications meet the requirements.
Once you have installed the necessary software, the next step is to create an OpenAI API key. An API key is a unique identifier that is used to authenticate requests made to an API. In the case of ChatGPT, the API key is used to access the OpenAI API, which is a critical component of the ChatGPT system.
After creating the API key, the next step is to configure your environment to interact with the ChatGPT API. This process involves ensuring that your API key is correctly configured and that your environment is set up to send and receive requests to and from the ChatGPT API.
In this section, we will walk you through each step in detail, ensuring that your development environment is optimized for seamless integration with ChatGPT. By following these steps, you can be confident that your development environment is set up correctly and that you are ready to start working with ChatGPT.
2.1.1. Installing Required Software
To work with ChatGPT, you will need to have the following software installed on your computer:
Python
ChatGPT is designed to work with Python, a popular programming language for AI and machine learning applications. Make sure you have the latest version of Python installed.

To install Python on your computer follow the following steps:
Step 1: Go to www.python.org
Step 2: Select ‘Downloads’ from the toolbar

Step 3: Click on ‘Download Python 3.8.1’ or the latest version available

Step 4: Then, go to the File option. After that, a security dialog box will appear as shown below. Click on ‘Run’ to continue the installation process

Step 5: Click on ‘Install Now’

Once you do that, you can see the setup in progress as in the below screenshot:

Step 6: After the installation of Python, when you see a window with the message ‘Setup was successful’, click on the ‘Close’ button

Now, you are ready with Python 3.8.1 installed in your system.
Further, we will move on to the installation of PyCharm.
A code editor
A code editor is essential for writing and editing your Python scripts. There are several IDEs and code editors available for Python development. Here, we'll discuss setting up three popular options: PyCharm, Visual Studio Code (VSCode), and Jupyter Notebook.
PyCharm
Step 1: To download PyCharm, visit the official website of JetBrains: http://www.jetbrains.com/pycharm/

Step 2: Click on the ‘Download’’ button
Step 3: After that, you will see the below window with two options, Professional and Community
Step 4: Download the Community version
Note: If you are interested to work with the Professional version, then you can download the Professional version and avail a free trial.

Step 5: After downloading the file, click on it
Step 6: When the following window appears, click on Next and the installation process will start

Step 7: After clicking on Next, first, a window for setting up the installation location will appear.
Note: You can either select a folder for the installation location or retain the default path.

Step 8: In the next step, you can set the Installation Options as per requirements, and then, click on the Next button to proceed

Step 9: Now, you have to select the Start Menu folder, or you can leave it as default

Step 10: After these steps, click on the Install button as above to start the installation process

Step 11: When you click on the Finish button, your PyCharm installation completes

Now, you have successfully installed PyCharm and Python both in your system.
Configuring PyCharm
The first time PyCharm launches, it will offer you the chance to import older settings (from a previous PyCharm installation).

If you are installing PyCharm for the first time, you don't need to import settings. The next screen will ask you to customize PyCharm. The first question is to select a keymap scheme. Keymap scheme refers to keyboard shortcuts, check the different examples in the figure. You can leave it as it if you never used PyCharm before, and it is updated for newer Mac OS versions.

I click on Next: UI Themes. On the following page, I opted for the dark 'Darcula' theme. Don't be disappointed if you don't like any of the themes right now. Later you can add a plugin that allows you to choose between several other beautiful options 😍 (hint: it's a plugin called Material UI Theme). After you chose, click on Next: Launcher Script. A Launcher script adds a small terminal program that can launch PyCharm from your terminal in any given directory. What I mean is that it allows you to do the following:
charm ~/DeveloperProjects/MyNewPythonApplicationIn that line, I am launching PyCharm in the directory called 'MyNewPythonApplication' that is a sub-directory of 'DeveloperProjects.' If you like this feature, check the box. To continue, click on Next: Featured plugins.

On the next screen, Pycharm suggests popular plugins. That's a personal choice. The configuration is almost ready, now click on Start using PyCharm.

Creating a new project in PyCharm
Now, the next step is to either open an old project (from a repository on your local machine or version control) or create a new project. Let's suppose you want to start a new project. Then, click on + Create New Project.

If you chose the professional version of PyCharm, you can select among several project options from the left sidebar. Or, in case you have the free version, you won't have these options, so you can only open a new Pure Python project. You can create a new project in the same way, though. Chose the location (directory) where you want to save your project.
By clicking on Project Interpreter: New Virtualenv environment, you can choose the environment options for your new project. When you are coding in Python, you will probably make use of several libraries. The environment will hold all the libraries you will install for that project. There are two options 1) New environment or 2) Existing interpreter.

The new environment (first) option gives yet three possibilities, Virtualenv, Pipenv, or Conda. Virtualenv is the default option. Pipenv is newer, and it is supposed to have extra functionalities. To make use of Conda, you need to have installed the Anaconda or Miniconda on your machine. You can use the default Virtualenv. Besides, you can choose the Base interpreter (Python 3 recommended). Click on Create to continue.

Before you can start coding, PyCharm suggests a 'Tip of the Day' option with tricks on how to increase your productivity by using keyboard shortcuts. If you think you don't need them, you can uncheck this option on the bottom left corner of the pop-up. After that, close the pop-up. Now you can create a new file by clicking Cmd + N (on Mac) or clicking on File > New > File or clicking File > New > Python File (from templates). If you chose the last option, PyCharm will create a file with the .py extension.
You can finally write your code! After you are ready, you can run your script by clicking Run on the main menu (the green arrow on the top right corner) or pressing Ctrl + Option + R on the keyboard. PyCharm offers several features to help you code.
Visual Studio Code (VSCode)
Getting up and running with Visual Studio Code is swift and straightforward. It is a small download so you can install it quickly and give the VS Code a try. VS Code is a free code editor. Additionally, it runs on the macOS, Linux, and Windows operating systems. Let's see how we can set up the same in the different platforms we use.
The first step is shared across all the platforms irrespective of any OS you are using.
Download Visual Studio Code:
You can download Visual Studio code from URL "https://code.visualstudio.com/download" by selecting the right platform:

You can click any of the icons mentioned above, depending on the operating system for which you are planning to download the visual studio code editor.
How to install Visual Studio Code on macOS?
Follow the below steps*(shown in gif file and mentioned in bullet points)* to install the VS Code on macOS:
- Download Visual Studio Code for macOS.
- After clicking on the Mac option on the download site, it will download a zip file, as shown below:
- Double-click on the downloaded zip to expand the contents. It will give a file, as shown below:
- Drag "Visual Studio Code.app" to the "Applications" folder, so as it available in the "Launchpad."
- Double click on the "Visual Studio Code" to open.
- Add VS Code to your Dock by right-clicking on the icon to bring up the context menu and choosing Options => Keep in Dock.

How to Install Visual Studio Code on Windows?
Firstly, download the Visual Studio Code installer for Windows. Once it is downloaded, run the installer (VSCodeUserSetup-{version}.exe). It will only take a minute.
Secondly, accept the agreement and click on next.

Thirdly, click on "create a desktop icon" so that it can be accessed from desktop and click on Next.

After that, click on the install button.

Finally, after installation completes, click on the finish button, and the visual studio code will get open.

By default, VS Code installs under C:\users{username}\AppData\Local\Programs\Microsoft VS Code.

After the successful installation, let's move to the next section to understand the various components of the User Interface of Visual Studio Code Editor.
What are the essential components of the VS Code?
Visual Studio Code is a code editor at its core. Like many other code editors, VS Code adopts a standard user interface and layout of an explorer on the left, showing all of the files and folders you have access to. Additionally, it has an editor on the right, showing the content of the files you have opened. Below are a few of the most critical components the VSCode editor:

VS Code comes with a straight-forward and intuitive layout that maximizes the space provided for the editor while leaving ample room to browse. Additionally, it allows access to the full context of your folder or project. The UI is divided into five areas, as highlighted in the above image.
- Editor - It is the main area to edit your files. You can open as many editors as possible side by side vertically and horizontally.
- SideBar - Contains different views like the Explorer to assist you while working on your project.
- Status Bar - It contains the information about the opened project and the files you edit.
- Activity Bar - It is located on the far left-hand side. It lets you switch between views and gives you additional context-specific indicators, like the number of outgoing changes when Git is enabled.
- Panels - It displays different panels below the editor region for output or debug information, errors, and warnings, or an integrated terminal. Additionally, the panel can also move to the right for more vertical space.
VS Code opens up in the same state it was last in, every time you start it. It also preserves folder, layout, and opened files.
Jupyter Notebook
- To install Jupyter Notebook, open a command prompt (Windows) or terminal (macOS or Linux) and run the following command:
pip install notebook - Once the installation is complete, launch Jupyter Notebook by running the following command:
jupyter notebookThis will open a new browser window with the Jupyter Notebook interface.
- To create a new Python notebook, click on "New" in the upper-right corner and select "Python 3" (or the appropriate Python version) from the dropdown menu.
- You can now write Python code in the notebook cells and execute them by clicking "Run" or pressing
Shift+Enter. Jupyter Notebook allows you to mix code, text, and multimedia content, making it an excellent tool for interactive data exploration and documentation.
Git (optional)
Git is a widely-used version control system that can help you manage your code and collaborate with other developers. While not strictly necessary for working with ChatGPT, it can be helpful if you plan to work on larger projects or collaborate with a team.
GitHub is a web-based platform that is widely used by developers for version control and collaborative software development. It provides a place for developers to store their code and collaborate with others on a project. GitHub is built on top of Git, which is a distributed version control system that allows developers to keep track of changes made to their code over time.
One of the main benefits of GitHub is its ease of collaboration. Developers can easily share their code with others and work together on a project, regardless of their physical location. This makes it much easier for developers to work together on a project, especially if they are spread out across different locations or time zones.
Another key benefit of GitHub is its powerful version control features. This means that developers can keep track of changes made to their code over time, and easily roll back to a previous version if necessary. This is particularly useful when working on complex projects with multiple developers, where changes to the code can be difficult to keep track of.
GitHub also allows developers to easily share their code with others, and even collaborate on open source projects. This means that developers can contribute to projects that they are interested in, and learn from others in the community.
To get started with GitHub, you'll need to create an account and set up a repository for your project. Once you've done this, you can start adding files and making changes to your code, and collaborate with others on your project. Overall, GitHub is an incredibly useful tool for developers, and is widely used in the industry for collaborative software development.
2.1. Setting Up Your Development Environment
In this chapter, we will provide you with a comprehensive guide on how to get started with ChatGPT. We understand that starting a new project can be overwhelming, so we've made sure to include all the essential steps to ensure you have a smooth and successful integration process.
First, we'll start by identifying the tools and knowledge you need to effectively utilize this powerful AI language model in your projects. We'll cover the basics of setting up your development environment and integrating the ChatGPT API.
In addition to the basics, we'll also delve into the more advanced features and parameters available to customize your ChatGPT experience. This includes learning how to interact with the ChatGPT API and the various features available to you.
As you progress through this chapter, you'll learn about the intricacies of configuring your development environment, understanding the ChatGPT API, and navigating the different features available to you. We'll offer practical advice and clear examples to make sure you have a complete understanding of ChatGPT.
By the end of this chapter, you'll be well-equipped to harness the capabilities of ChatGPT and begin implementing it into your applications, projects, or business processes. You'll have a deep understanding of the integration process and be able to use ChatGPT to its fullest potential.
Before you can start working with ChatGPT, it is crucial to understand the importance of creating a well-structured development environment. A well-structured development environment ensures that your workflow is optimized, making it easier for you to focus on the task at hand.
The first step towards creating a well-structured development environment is to install the necessary software. This process involves ensuring that you have the correct version of the software and that your system specifications meet the requirements.
Once you have installed the necessary software, the next step is to create an OpenAI API key. An API key is a unique identifier that is used to authenticate requests made to an API. In the case of ChatGPT, the API key is used to access the OpenAI API, which is a critical component of the ChatGPT system.
After creating the API key, the next step is to configure your environment to interact with the ChatGPT API. This process involves ensuring that your API key is correctly configured and that your environment is set up to send and receive requests to and from the ChatGPT API.
In this section, we will walk you through each step in detail, ensuring that your development environment is optimized for seamless integration with ChatGPT. By following these steps, you can be confident that your development environment is set up correctly and that you are ready to start working with ChatGPT.
2.1.1. Installing Required Software
To work with ChatGPT, you will need to have the following software installed on your computer:
Python
ChatGPT is designed to work with Python, a popular programming language for AI and machine learning applications. Make sure you have the latest version of Python installed.

To install Python on your computer follow the following steps:
Step 1: Go to www.python.org
Step 2: Select ‘Downloads’ from the toolbar

Step 3: Click on ‘Download Python 3.8.1’ or the latest version available

Step 4: Then, go to the File option. After that, a security dialog box will appear as shown below. Click on ‘Run’ to continue the installation process

Step 5: Click on ‘Install Now’

Once you do that, you can see the setup in progress as in the below screenshot:

Step 6: After the installation of Python, when you see a window with the message ‘Setup was successful’, click on the ‘Close’ button

Now, you are ready with Python 3.8.1 installed in your system.
Further, we will move on to the installation of PyCharm.
A code editor
A code editor is essential for writing and editing your Python scripts. There are several IDEs and code editors available for Python development. Here, we'll discuss setting up three popular options: PyCharm, Visual Studio Code (VSCode), and Jupyter Notebook.
PyCharm
Step 1: To download PyCharm, visit the official website of JetBrains: http://www.jetbrains.com/pycharm/

Step 2: Click on the ‘Download’’ button
Step 3: After that, you will see the below window with two options, Professional and Community
Step 4: Download the Community version
Note: If you are interested to work with the Professional version, then you can download the Professional version and avail a free trial.

Step 5: After downloading the file, click on it
Step 6: When the following window appears, click on Next and the installation process will start

Step 7: After clicking on Next, first, a window for setting up the installation location will appear.
Note: You can either select a folder for the installation location or retain the default path.

Step 8: In the next step, you can set the Installation Options as per requirements, and then, click on the Next button to proceed

Step 9: Now, you have to select the Start Menu folder, or you can leave it as default

Step 10: After these steps, click on the Install button as above to start the installation process

Step 11: When you click on the Finish button, your PyCharm installation completes

Now, you have successfully installed PyCharm and Python both in your system.
Configuring PyCharm
The first time PyCharm launches, it will offer you the chance to import older settings (from a previous PyCharm installation).

If you are installing PyCharm for the first time, you don't need to import settings. The next screen will ask you to customize PyCharm. The first question is to select a keymap scheme. Keymap scheme refers to keyboard shortcuts, check the different examples in the figure. You can leave it as it if you never used PyCharm before, and it is updated for newer Mac OS versions.

I click on Next: UI Themes. On the following page, I opted for the dark 'Darcula' theme. Don't be disappointed if you don't like any of the themes right now. Later you can add a plugin that allows you to choose between several other beautiful options 😍 (hint: it's a plugin called Material UI Theme). After you chose, click on Next: Launcher Script. A Launcher script adds a small terminal program that can launch PyCharm from your terminal in any given directory. What I mean is that it allows you to do the following:
charm ~/DeveloperProjects/MyNewPythonApplicationIn that line, I am launching PyCharm in the directory called 'MyNewPythonApplication' that is a sub-directory of 'DeveloperProjects.' If you like this feature, check the box. To continue, click on Next: Featured plugins.

On the next screen, Pycharm suggests popular plugins. That's a personal choice. The configuration is almost ready, now click on Start using PyCharm.

Creating a new project in PyCharm
Now, the next step is to either open an old project (from a repository on your local machine or version control) or create a new project. Let's suppose you want to start a new project. Then, click on + Create New Project.

If you chose the professional version of PyCharm, you can select among several project options from the left sidebar. Or, in case you have the free version, you won't have these options, so you can only open a new Pure Python project. You can create a new project in the same way, though. Chose the location (directory) where you want to save your project.
By clicking on Project Interpreter: New Virtualenv environment, you can choose the environment options for your new project. When you are coding in Python, you will probably make use of several libraries. The environment will hold all the libraries you will install for that project. There are two options 1) New environment or 2) Existing interpreter.

The new environment (first) option gives yet three possibilities, Virtualenv, Pipenv, or Conda. Virtualenv is the default option. Pipenv is newer, and it is supposed to have extra functionalities. To make use of Conda, you need to have installed the Anaconda or Miniconda on your machine. You can use the default Virtualenv. Besides, you can choose the Base interpreter (Python 3 recommended). Click on Create to continue.

Before you can start coding, PyCharm suggests a 'Tip of the Day' option with tricks on how to increase your productivity by using keyboard shortcuts. If you think you don't need them, you can uncheck this option on the bottom left corner of the pop-up. After that, close the pop-up. Now you can create a new file by clicking Cmd + N (on Mac) or clicking on File > New > File or clicking File > New > Python File (from templates). If you chose the last option, PyCharm will create a file with the .py extension.
You can finally write your code! After you are ready, you can run your script by clicking Run on the main menu (the green arrow on the top right corner) or pressing Ctrl + Option + R on the keyboard. PyCharm offers several features to help you code.
Visual Studio Code (VSCode)
Getting up and running with Visual Studio Code is swift and straightforward. It is a small download so you can install it quickly and give the VS Code a try. VS Code is a free code editor. Additionally, it runs on the macOS, Linux, and Windows operating systems. Let's see how we can set up the same in the different platforms we use.
The first step is shared across all the platforms irrespective of any OS you are using.
Download Visual Studio Code:
You can download Visual Studio code from URL "https://code.visualstudio.com/download" by selecting the right platform:

You can click any of the icons mentioned above, depending on the operating system for which you are planning to download the visual studio code editor.
How to install Visual Studio Code on macOS?
Follow the below steps*(shown in gif file and mentioned in bullet points)* to install the VS Code on macOS:
- Download Visual Studio Code for macOS.
- After clicking on the Mac option on the download site, it will download a zip file, as shown below:
- Double-click on the downloaded zip to expand the contents. It will give a file, as shown below:
- Drag "Visual Studio Code.app" to the "Applications" folder, so as it available in the "Launchpad."
- Double click on the "Visual Studio Code" to open.
- Add VS Code to your Dock by right-clicking on the icon to bring up the context menu and choosing Options => Keep in Dock.

How to Install Visual Studio Code on Windows?
Firstly, download the Visual Studio Code installer for Windows. Once it is downloaded, run the installer (VSCodeUserSetup-{version}.exe). It will only take a minute.
Secondly, accept the agreement and click on next.

Thirdly, click on "create a desktop icon" so that it can be accessed from desktop and click on Next.

After that, click on the install button.

Finally, after installation completes, click on the finish button, and the visual studio code will get open.

By default, VS Code installs under C:\users{username}\AppData\Local\Programs\Microsoft VS Code.

After the successful installation, let's move to the next section to understand the various components of the User Interface of Visual Studio Code Editor.
What are the essential components of the VS Code?
Visual Studio Code is a code editor at its core. Like many other code editors, VS Code adopts a standard user interface and layout of an explorer on the left, showing all of the files and folders you have access to. Additionally, it has an editor on the right, showing the content of the files you have opened. Below are a few of the most critical components the VSCode editor:

VS Code comes with a straight-forward and intuitive layout that maximizes the space provided for the editor while leaving ample room to browse. Additionally, it allows access to the full context of your folder or project. The UI is divided into five areas, as highlighted in the above image.
- Editor - It is the main area to edit your files. You can open as many editors as possible side by side vertically and horizontally.
- SideBar - Contains different views like the Explorer to assist you while working on your project.
- Status Bar - It contains the information about the opened project and the files you edit.
- Activity Bar - It is located on the far left-hand side. It lets you switch between views and gives you additional context-specific indicators, like the number of outgoing changes when Git is enabled.
- Panels - It displays different panels below the editor region for output or debug information, errors, and warnings, or an integrated terminal. Additionally, the panel can also move to the right for more vertical space.
VS Code opens up in the same state it was last in, every time you start it. It also preserves folder, layout, and opened files.
Jupyter Notebook
- To install Jupyter Notebook, open a command prompt (Windows) or terminal (macOS or Linux) and run the following command:
pip install notebook - Once the installation is complete, launch Jupyter Notebook by running the following command:
jupyter notebookThis will open a new browser window with the Jupyter Notebook interface.
- To create a new Python notebook, click on "New" in the upper-right corner and select "Python 3" (or the appropriate Python version) from the dropdown menu.
- You can now write Python code in the notebook cells and execute them by clicking "Run" or pressing
Shift+Enter. Jupyter Notebook allows you to mix code, text, and multimedia content, making it an excellent tool for interactive data exploration and documentation.
Git (optional)
Git is a widely-used version control system that can help you manage your code and collaborate with other developers. While not strictly necessary for working with ChatGPT, it can be helpful if you plan to work on larger projects or collaborate with a team.
GitHub is a web-based platform that is widely used by developers for version control and collaborative software development. It provides a place for developers to store their code and collaborate with others on a project. GitHub is built on top of Git, which is a distributed version control system that allows developers to keep track of changes made to their code over time.
One of the main benefits of GitHub is its ease of collaboration. Developers can easily share their code with others and work together on a project, regardless of their physical location. This makes it much easier for developers to work together on a project, especially if they are spread out across different locations or time zones.
Another key benefit of GitHub is its powerful version control features. This means that developers can keep track of changes made to their code over time, and easily roll back to a previous version if necessary. This is particularly useful when working on complex projects with multiple developers, where changes to the code can be difficult to keep track of.
GitHub also allows developers to easily share their code with others, and even collaborate on open source projects. This means that developers can contribute to projects that they are interested in, and learn from others in the community.
To get started with GitHub, you'll need to create an account and set up a repository for your project. Once you've done this, you can start adding files and making changes to your code, and collaborate with others on your project. Overall, GitHub is an incredibly useful tool for developers, and is widely used in the industry for collaborative software development.


