

Chapter 4: DOM Manipulation
4.1 Understanding the DOM
Welcome to Chapter 4, a chapter dedicated to exploring one of the most critical and fundamental areas of web development—DOM manipulation. The Document Object Model (DOM) is not just a programming interface for HTML and XML documents, but it is the backbone that provides a structured representation of the document. This representation comes in the form of a tree of nodes that can be interacted with and modified using programming languages like JavaScript.
Understanding the intricacies of the DOM is not just important, but it is absolutely critical for any web developer as it is the key to dynamically altering the content, structure, and style of web pages. Without a firm grasp of the DOM, a web developer's ability to create dynamic and interactive web pages would be greatly diminished.
This chapter is not just about guiding you through the basics or fundamentals of the DOM. Rather, it delves deeper into the techniques for manipulating the DOM, and it helps develop a strong understanding of the best practices for ensuring your applications are not just efficient, but also responsive. We are going to take a journey together into the heart of web development, starting with a fundamental understanding of the DOM, and emerging with a comprehensive understanding that will enhance your web development skills.
The Document Object Model (DOM) is essentially a tree-like representation of the contents of a web page. It is a key concept in web development that is crucial to understanding how web pages work. After the HTML document is fully loaded, the browser painstakingly creates this model, turning every HTML element into an object that can be manipulated programmatically using JavaScript or similar languages.
This process allows developers to interact with and modify the contents and structure of a web page in real-time, leading to the dynamic and interactive web experiences we see today. Grasping this structure and how it functions is the first critical step toward mastering the behavior of dynamic web pages and becoming proficient in interactive web development.
4.1.1 What is the DOM?
The Document Object Model, often abbreviated as the DOM, is a crucial concept in web development, although it is not an inherent part of the JavaScript programming language itself. Instead, the DOM is a universally accepted standard established for how to interact with HTML elements. It offers a systematic way to access, modify, add, or delete HTML elements. Essentially, the DOM serves as a bridge or interface that allows JavaScript to communicate and interact with the HTML and CSS of a webpage seamlessly.
This interaction is achieved by treating the various parts of the webpage as objects, which can be manipulated by JavaScript. In essence, the DOM translates the webpage into an object-oriented structure that JavaScript can understand and interact with, thereby enabling the manipulation of webpage elements.
One of the most powerful capabilities of the DOM is its ability to change the structure, style, and content of a webpage dynamically. This dynamic nature of the DOM, combined with JavaScript, creates interactive and robust web experiences that respond to user input and actions. This means that the DOM enables JavaScript to react to user events, change webpage content on the fly, and even alter the appearance and style of the webpage in response to user actions.
Understanding the DOM is essential for any web developer. It provides the necessary tools to make websites more interactive and user-friendly, thereby enhancing the overall user experience.
Example: Viewing the DOM
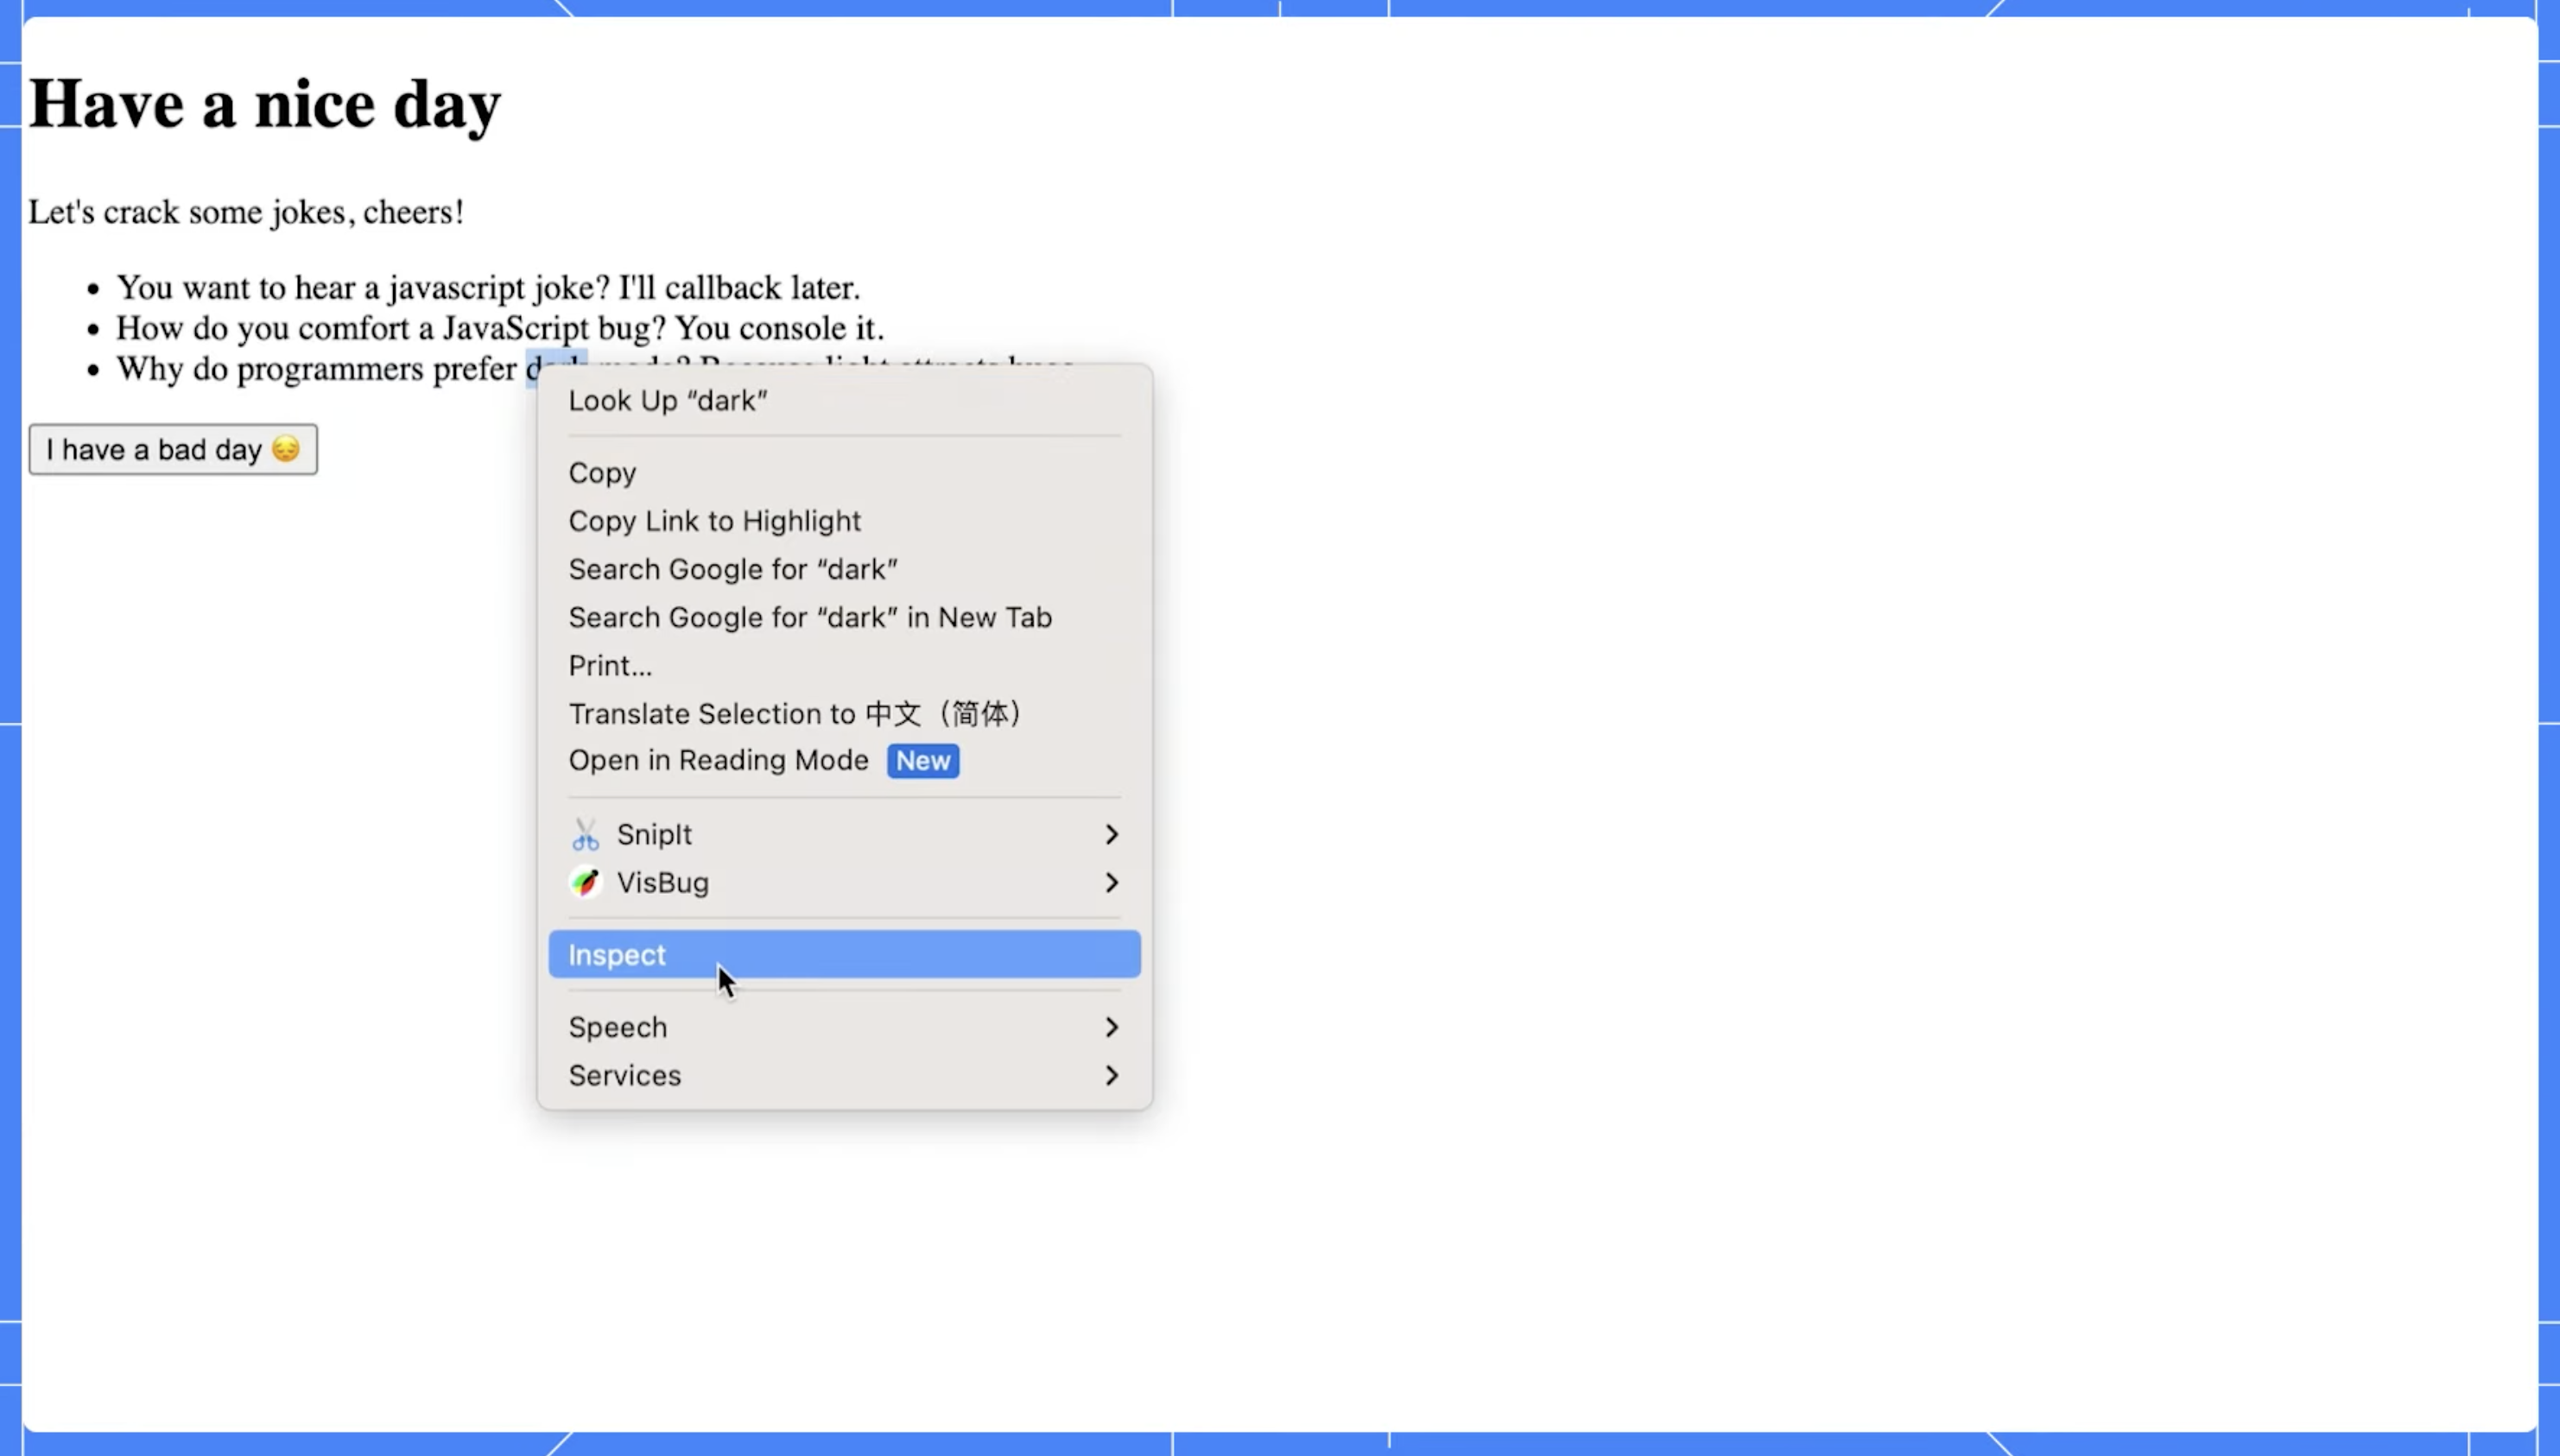
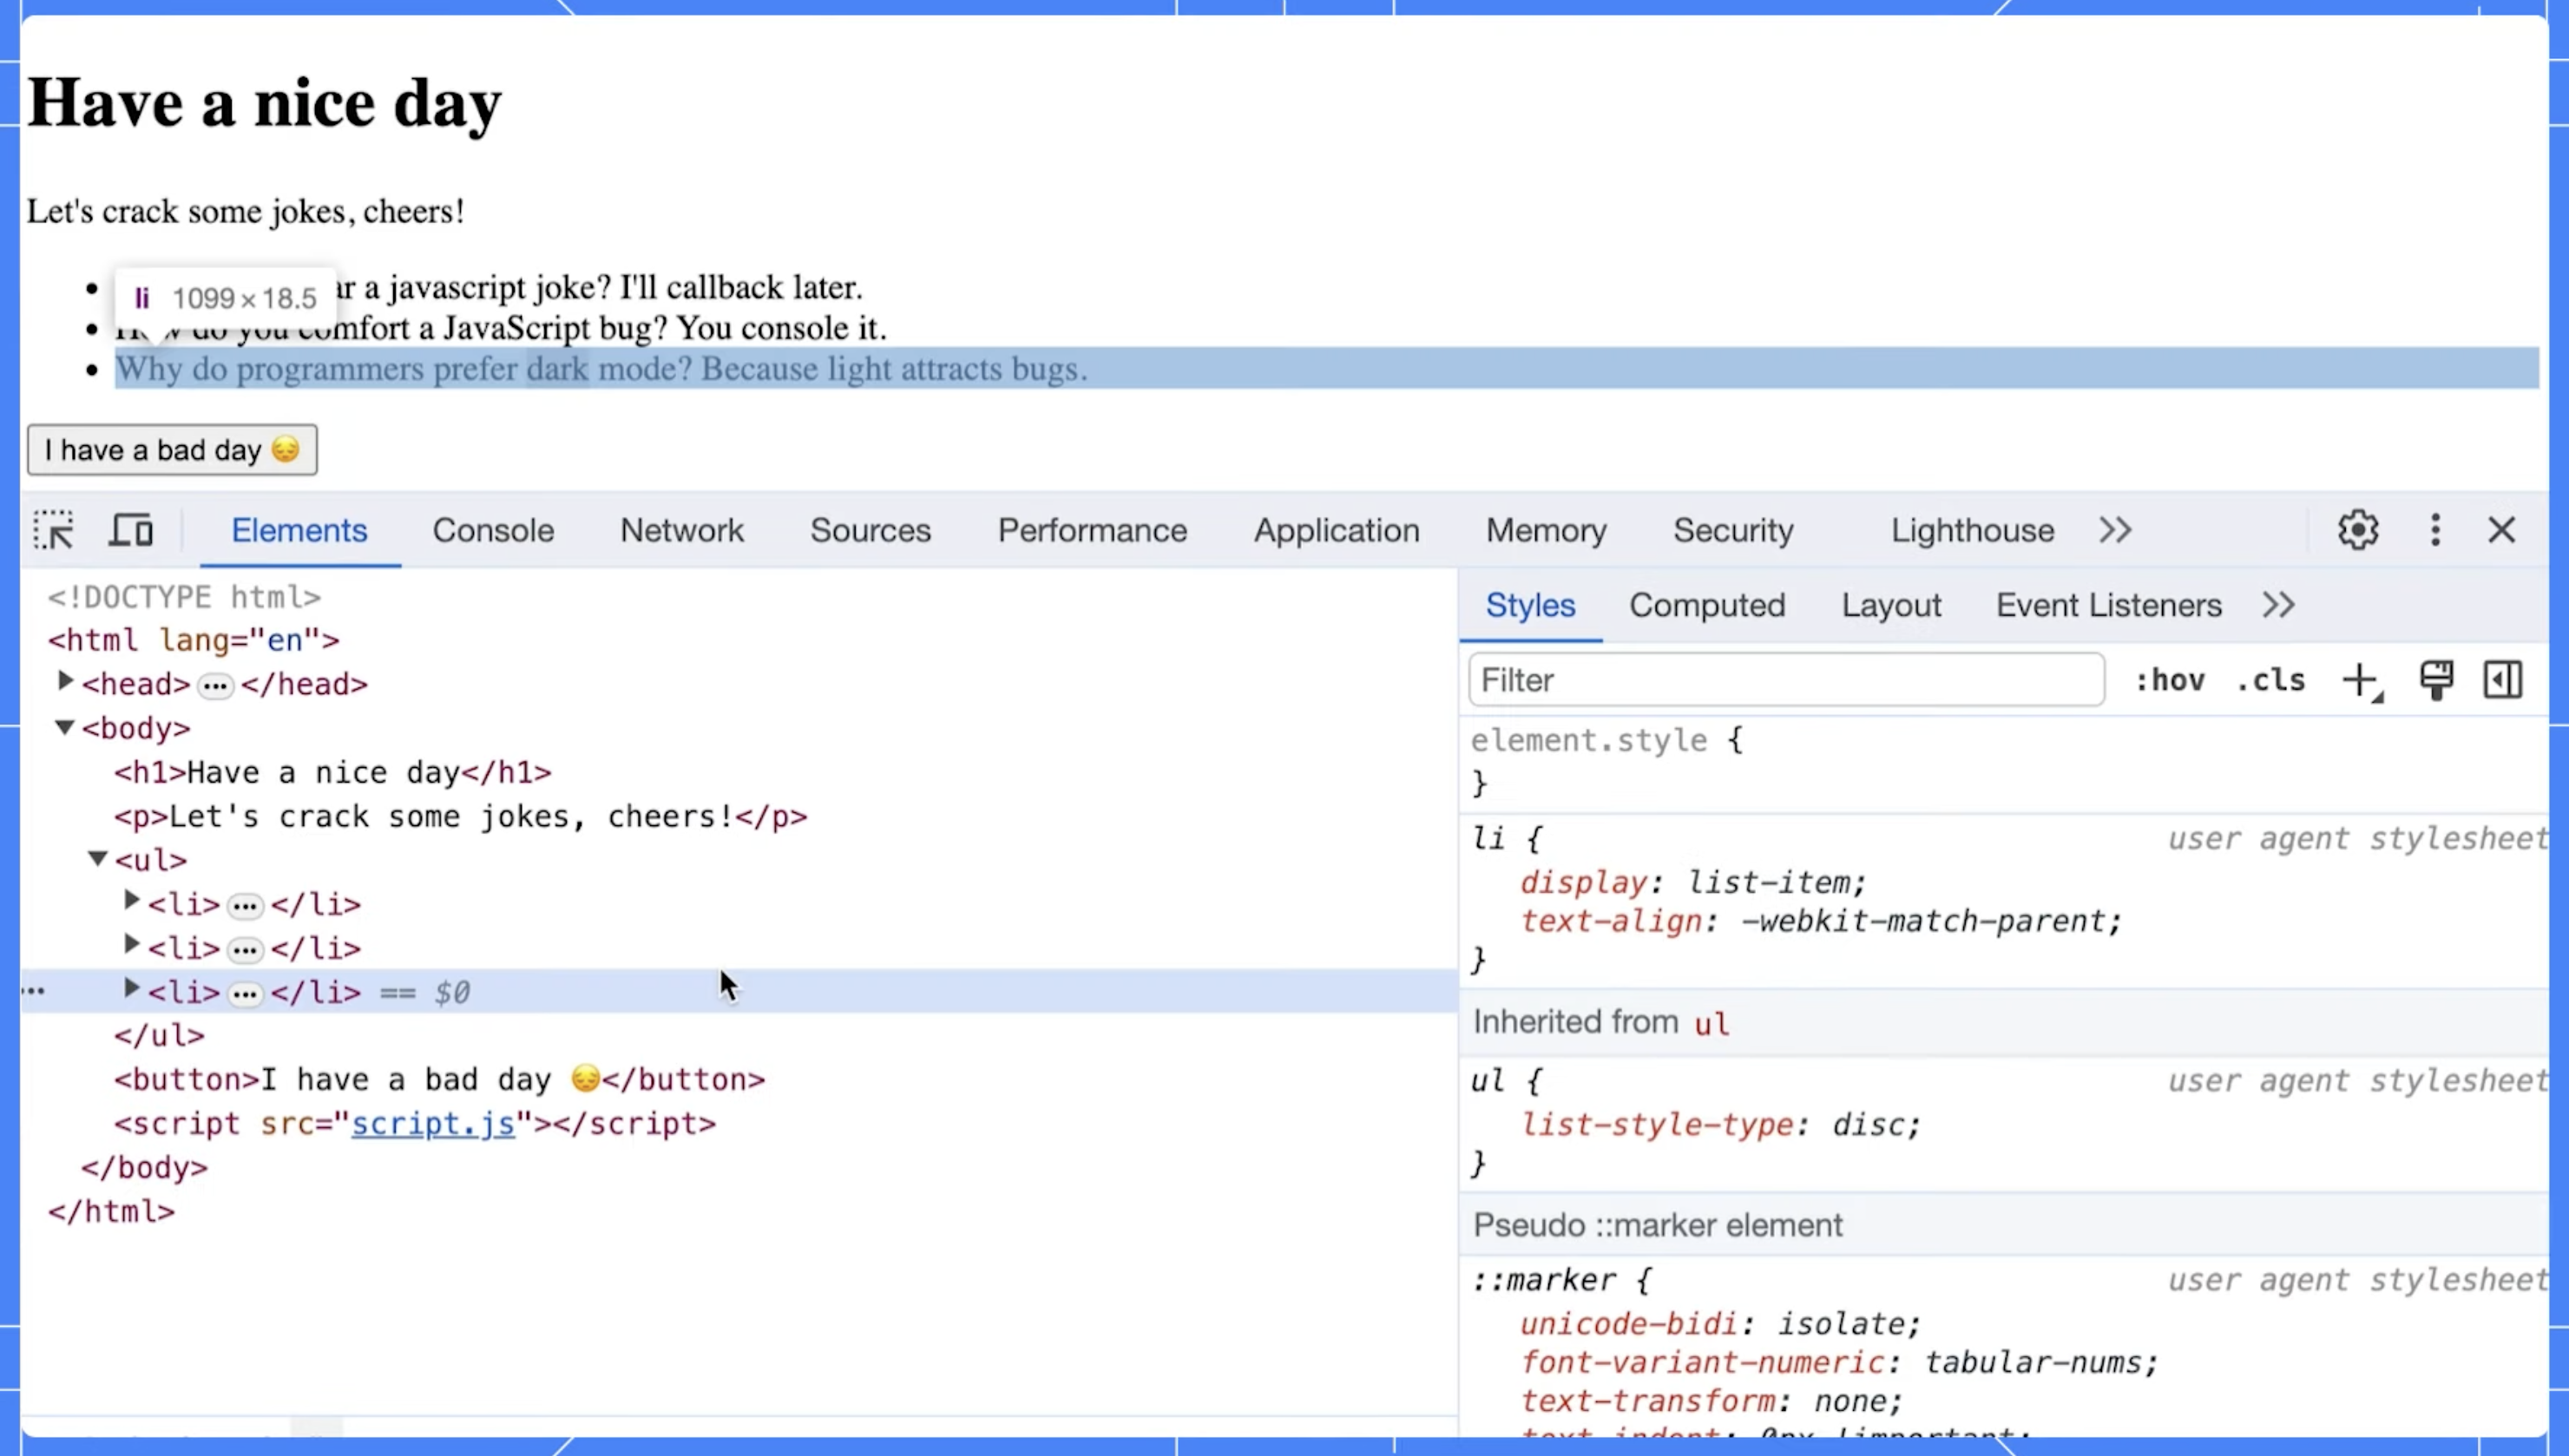
When an HTML document is loaded into a web browser, it is represented internally using a structure known as the Document Object Model, or DOM. This model is a crucial part of web development, as it provides a systematic way for programming languages like JavaScript to interact with the document's elements. The DOM is essentially a tree-like representation of the contents of a webpage.
These developer tools, which are typically accessible via the browser's menu or using a keyboard shortcut, possess various features designed to help developers inspect and debug web pages. One of these features is a visual representation of the DOM.
When you open the developer tools and navigate to the section displaying the DOM (often labeled as 'Elements' or 'Inspector'), you will see a structured, nested list that mirrors the content and organization of the webpage. Each HTML element of the webpage corresponds to a node in the DOM tree. By expanding these nodes (usually by clicking on a small arrow or plus symbol), you can see the child nodes that correspond to the nested HTML elements.
This visual representation of the DOM is interactive. Clicking on a node in the DOM will highlight the corresponding element in the webpage. This is beneficial when trying to understand the layout and structure of complex webpages.
In addition, viewing the DOM allows you to see the current state of the webpage's structure, including any changes that have been made programmatically using JavaScript. You can also edit the DOM directly within the developer tools, allowing you to experiment with changes and immediately see the results.
In essence, the ability to view and interact with the DOM via a browser's developer tools is a powerful asset in a web developer's toolkit. It supports not only understanding the tree structure of a document but also debugging and optimizing web pages.
4.1.2 Structure of the DOM
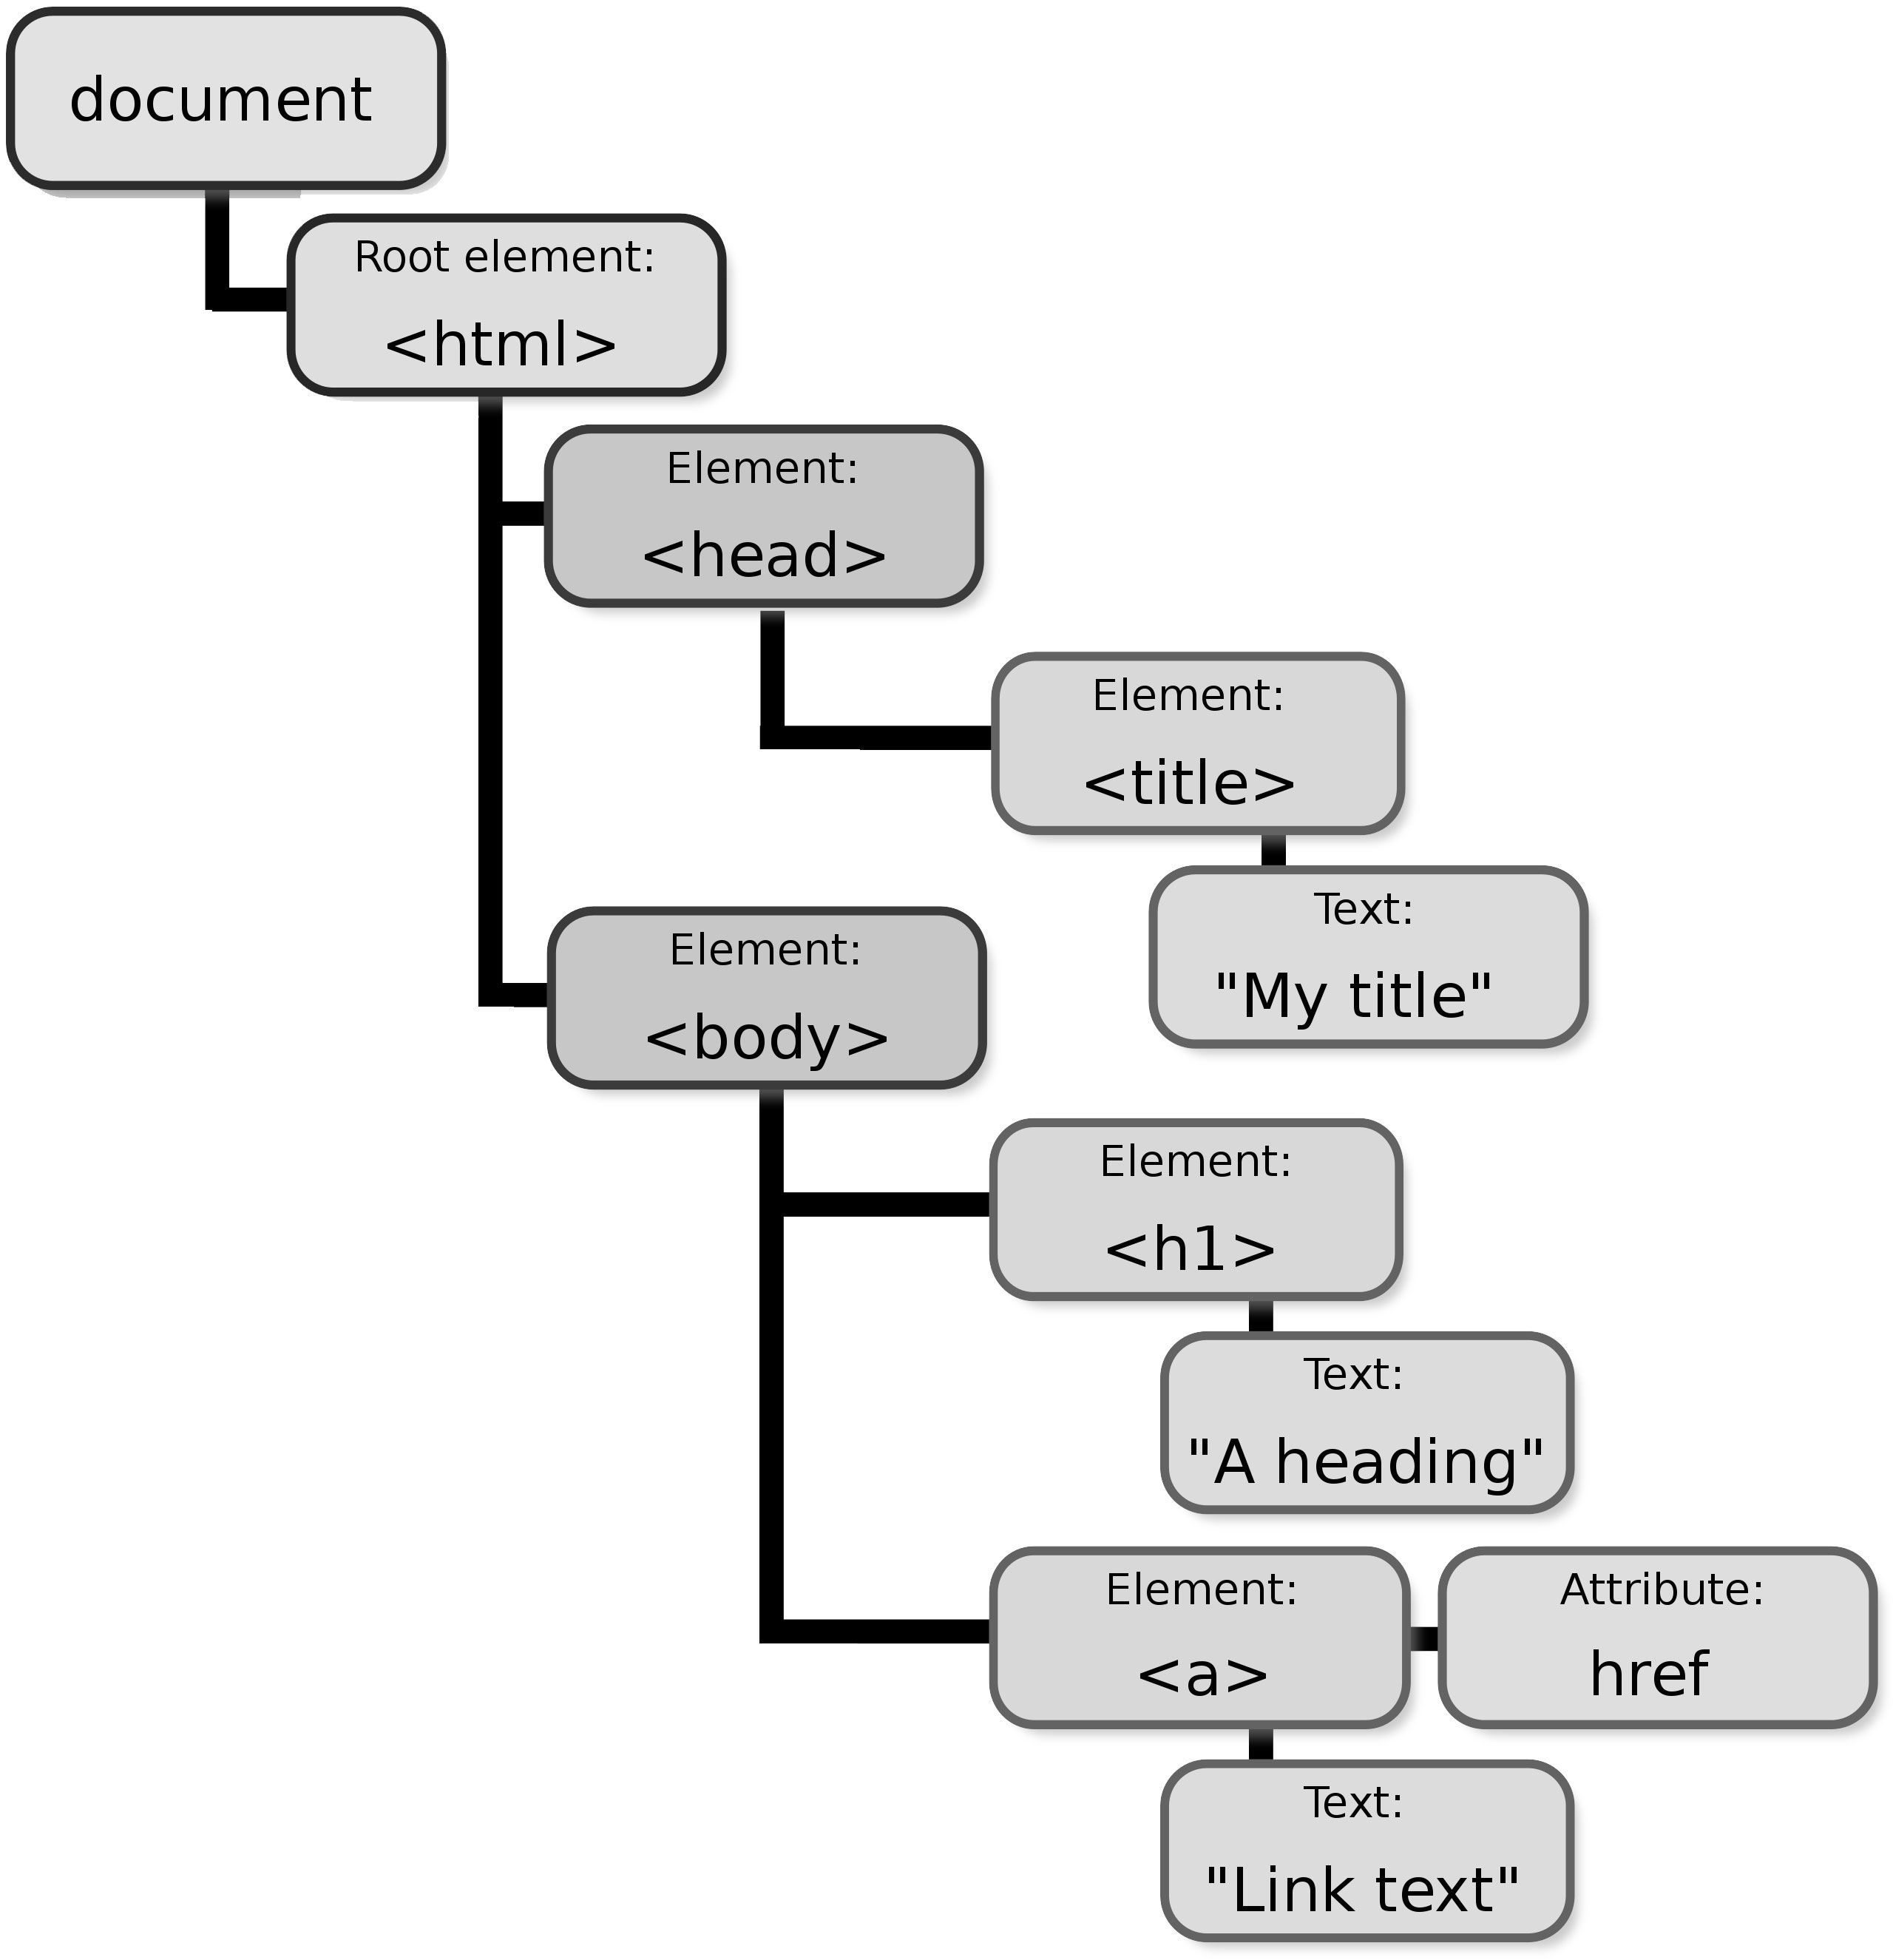
As discussed, the Document Object Model, also known as the DOM, is a structured, tree-like layout that fundamentally represents the contents and structure of a web page. This model is a crucial part of web development as it allows scripts and programming languages to interact with the contents of a webpage dynamically.
The DOM structure is composed of various nodes, with each node representing a different component of the document. These components can be an element, attribute, or even the text within the document. Each of these nodes carries a specific function and plays a crucial role in representing the document’s structure and content.
The DOM, with its hierarchical tree-like structure, provides an efficient way to traverse, manipulate and interact with the information on a webpage.
The types of nodes in the DOM structure include:
Nodes
In the context of the Document Object Model, or DOM, every individual component present within the document forms part of the DOM tree and is referred to as a 'node'. This includes every element, attribute, and even piece of text contained within the document.
To provide some specific examples, an <h1> HTML tag would be considered a node within this structure. Similarly, any text that is contained within a paragraph, even if it's a single word or character, is also classified as a separate node.
These nodes are the fundamental building blocks of any webpage and enable the dynamic interaction between the code and the document's content that is so integral to modern web design.
Example:
<h1>Welcome to my Website!</h1>In this example, both the <h1> element itself and the text "Welcome to my Website!" are nodes in the DOM tree. The <h1> element is an Element Node, while the text content is a Text Node.
Document Node
The root node is a fundamental component of the document structure. It serves as an essential representation of the entire document, encapsulating its complexity and offering a glimpse into its entirety. Acting as the starting point, the root node holds all other nodes within its structure, creating a hierarchical organization.
The information contained within the root node spreads out to encompass all other elements of the document. It acts like a container, holding within it all the various components that make up the document. This encapsulation is what gives the document its structure and order.
The root node serves as the primary reference point for accessing any part of the document. It is the first point of contact when navigating through the document's structure and provides a roadmap for accessing the various sections of the document. This essential function of the root node makes it a critical component in the overall structure and organization of the document.
Example:
<!DOCTYPE html>
<html>
<head>
  <title>My Website</title>
</head>
<body>
  <h1>Welcome to my Website!</h1>
  <p>This is some content.</p>
</body>
</html>
This code represents a basic HTML document structure. The entire document, from the <!DOCTYPE html> declaration to the closing </html> tag, along with all elements and text content within, is represented by the Document Node at the root of the DOM tree.
Element Nodes
These are fundamental components that represent HTML elements within a webpage. They are an integral part of the Document Object Model (DOM), which is a structured representation of the HTML elements on the page.
Each HTML tag on the page is represented by an Element Node in the DOM. These nodes can contain other nodes, including text nodes and other element nodes, which allows for the hierarchical structure that HTML documents usually have.
Example:
<ul>
  <li>Item 1</li>
  <li>Item 2</li>
  <img src="image.png" alt="My Image">
  <a href="https://www.example.com">Visit our website</a>
</ul>
This code snippet showcases various HTML elements like <ul>, <li>, <img>, and <a>. Each of these elements (ul, two li, img, and a) is a separate Element Node in the DOM tree.
Text Nodes
These are crucial components of the XML document structure, and they contain the actual text within the elements. They carry the information that the XML document is intended to convey and are enclosed within the start and end tags of an element.
Example:
<p>This is a paragraph with some text content.</p>Here, the text "This is a paragraph with some text content." within the <p> tags is a Text Node. Notice that Text Nodes don't have any child nodes of their own.
Attribute Nodes
These are nodes that are associated with the attributes of elements within an XML document. These attribute nodes contain additional information about element nodes and are often accessed directly through these element nodes. They hold data that provide more details about the elements but are not a part of the actual data content.
Example:
<img src="image.png" alt="My Image">In this example, the <img> element has an attribute named src with a value of "image.png". The src attribute itself is an Attribute Node associated with the <img> Element Node. While Attribute Nodes exist, they are typically accessed through the corresponding Element Node for ease (e.g., element.getAttribute("src")).
4.1.3 Navigating the DOM
In web development, you have the ability to traverse or navigate the Document Object Model (DOM) tree using different properties. These properties provide a roadmap of sorts that allows you to move around and manipulate elements within the DOM tree.
Some examples of these properties include parentNode, childNodes, and firstChild. The parentNode property, for instance, allows you to access the parent node of a specified node in the DOM tree. Similarly, the childNodes property lets you access all child nodes of a specified node, while the firstChild property specifically gives you the first child node of a specified node. By utilizing these properties, developers can efficiently interact with, and modify, elements within the DOM tree.
Example: DOM Navigation in Action
Let's look at a practical example using the provided HTML code:
<!DOCTYPE html>
<html>
<head>
    <title>Sample Page</title>
</head>
<body>
    <div id="content">
        <p>First paragraph</p>
        <p>Second paragraph</p>
    </div>
    <script>
        let contentDiv = document.getElementById('content');
        console.log(contentDiv.childNodes.length); // Outputs: 5 (includes text nodes, like whitespace)
        console.log(contentDiv.firstChild.nextSibling.textContent); // Outputs: 'First paragraph'
    </script>
</body>
</html>
In this example, the childNodes property includes all child nodes, including text nodes (which can be whitespace if the HTML is formatted with indents or spaces). The firstChild.nextSibling navigates to the first <p> element effectively. Now, let’s go deeper:
- Selecting the Element:
The code starts by selecting the element with the ID "content" using
document.getElementById('content'). This assigns the<div>element containing the paragraphs to the variablecontentDiv. - Navigating with
childNodes:- The first
console.logstatement usescontentDiv.childNodes.length. ThechildNodesproperty returns a collection (NodeList) of all child nodes of the specified element. In this case, it includes the two<p>elements, any text nodes (like whitespace between elements), and potentially comments (if present). This explains why the output is5even though we only see two paragraphs in the HTML.
- The first
- Navigating with
firstChildandnextSibling:- The second
console.logstatement demonstrates navigating to specific child nodes. Here's a step-by-step breakdown:contentDiv.firstChildaccesses the first child node of thecontentDiv(which is the<div>element). This refers to the first<p>element containing "First paragraph"..nextSiblingmoves to the next sibling node of the current node. Since the first<p>element has another<p>element as its sibling, this points to the second paragraph element with the text "Second paragraph".- Finally,
.textContentretrieves the text content within the selected element, which outputs "First paragraph" in this case.
- The second
Key Takeaways:
These properties (childNodes, firstChild, nextSibling) allow you to traverse the DOM tree and access specific elements relative to their position within the structure. This is essential for manipulating and interacting with elements in your web pages using JavaScript.
Understanding the DOM's structure and how to navigate it is fundamental for any web developer looking to create dynamic and responsive web applications. By manipulating the DOM, you can update the content, structure, and style of a webpage without needing to send a request to the server for a new page.
4.1.4 DOM as a Live Representation
A critical aspect of the Document Object Model (DOM), which should continually be at the forefront of your considerations, is its unique characteristic of providing what is referred to as a "live" representation of the HTML document.
This essentially means that the DOM is inherently dynamic rather than static. It's an interactive mirror of the current web page which means that any modifications made to the DOM, whether they are additions, deletions, or alterations, are instantaneously reflected on the web page.
This is a two-way street, as any changes to the web page's content or structure, perhaps due to user interaction or an automatic update, are immediately mirrored in the DOM. This continual synchronization between the DOM and the web page ensures that what you manipulate programmatically in the DOM is always consistent with what is visually rendered on the web page.
Example: Live DOM Updates
let list = document.createElement('ul');
document.body.appendChild(list);

let newItem = document.createElement('li');
newItem.textContent = 'New item';
list.appendChild(newItem); // Immediately visible on the web page
This example demonstrates how dynamically adding an element to the DOM immediately updates the webpage. The ul and li elements are created and added to the document dynamically, and these changes are instantly visible.
4.1.5 Performance Considerations
Working with the Document Object Model (DOM) can sometimes be a resource-heavy operation, particularly when it comes to performance. When there are constant alterations being made to the DOM, it can create a significant strain on the system, especially if the webpage in question is large or complex in its structure.
This can result in obvious performance issues, which can affect the overall user experience. As a result, it becomes absolutely crucial to streamline and optimize the way we interact with the DOM. This optimization is mostly targeted towards minimizing the occurrences of 'reflows' and 'repaints', which are processes that the browser has to undergo in order to recalculate the layout and redraw certain parts of the webpage.
By doing so, we not only make the webpage more efficient but also enhance the overall performance and user experience.
Best Practices for Optimizing DOM Manipulations
- Minimize DOM changes: One effective way to improve the performance of your web page is to minimize changes to the Document Object Model (DOM). You can do this by batching updates to the DOM. This means changing properties of elements while they are offscreen, and then appending or updating these elements on the page in one single operation. This reduces the amount of reflow and repaint operations the browser has to perform, leading to smoother rendering and a better user experience.
- Use document fragments: Another advantageous technique involves the use of document fragments. Document fragments allow you to hold a part of the DOM off-screen, giving you the freedom to make multiple changes, such as adding, modifying, or deleting nodes, without causing any page reflow. Once all changes are complete, the document fragment can be attached back to the document, causing only one reflow despite the multiple changes.
- Event delegation: An important aspect of efficient JavaScript is the appropriate use of event listeners. Instead of attaching event listeners to individual elements, which can be memory-intensive and lead to performance issues, it's often more beneficial to use a single listener on a parent element. This single listener can then handle events from child elements using a process called event propagation. This technique can significantly improve performance, particularly when dealing with a large number of similar elements.
Example: Using Document Fragments
let fragment = document.createDocumentFragment();
for (let i = 0; i < 10; i++) {
    let newItem = document.createElement('li');
    newItem.textContent = `Item ${i}`;
    fragment.appendChild(newItem);
}

document.getElementById('myList').appendChild(fragment);
This approach ensures that the DOM is updated all at once instead of in ten separate operations, significantly improving performance.
4.1.6 Accessibility and the DOM
When you're working with the Document Object Model (DOM) in web development, it's absolutely critical that you keep accessibility at the forefront of your considerations. The process of adding, removing, or modifying elements on your webpage can have a significant impact on the experience of users who depend on screen readers and other types of assistive technologies to navigate the internet.
This group of users can include those with visual or motor impairments. Therefore, it's important that we, as developers, ensure that our web content is not only dynamic but also fully accessible. One way to achieve this is by using proper ARIA (Accessible Rich Internet Applications) roles and properties.
These are integral tools that make dynamic and complex web content more accessible, especially for people with disabilities. By correctly implementing ARIA roles and properties, you can ensure that the content you add or change on the fly is still accessible to all users, thereby creating a more inclusive digital environment.
Example: Enhancing Accessibility with ARIA
let dialog = document.createElement('div');
dialog.setAttribute('role', 'dialog');
dialog.setAttribute('aria-labelledby', 'dialog_label');
dialog.textContent = 'This is an accessible dialog box.';
document.body.appendChild(dialog);
This example demonstrates setting ARIA roles and properties to inform assistive technologies about the role of the element and its state, enhancing accessibility for all users.
4.1 Understanding the DOM
Welcome to Chapter 4, a chapter dedicated to exploring one of the most critical and fundamental areas of web development—DOM manipulation. The Document Object Model (DOM) is not just a programming interface for HTML and XML documents, but it is the backbone that provides a structured representation of the document. This representation comes in the form of a tree of nodes that can be interacted with and modified using programming languages like JavaScript.
Understanding the intricacies of the DOM is not just important, but it is absolutely critical for any web developer as it is the key to dynamically altering the content, structure, and style of web pages. Without a firm grasp of the DOM, a web developer's ability to create dynamic and interactive web pages would be greatly diminished.
This chapter is not just about guiding you through the basics or fundamentals of the DOM. Rather, it delves deeper into the techniques for manipulating the DOM, and it helps develop a strong understanding of the best practices for ensuring your applications are not just efficient, but also responsive. We are going to take a journey together into the heart of web development, starting with a fundamental understanding of the DOM, and emerging with a comprehensive understanding that will enhance your web development skills.
The Document Object Model (DOM) is essentially a tree-like representation of the contents of a web page. It is a key concept in web development that is crucial to understanding how web pages work. After the HTML document is fully loaded, the browser painstakingly creates this model, turning every HTML element into an object that can be manipulated programmatically using JavaScript or similar languages.
This process allows developers to interact with and modify the contents and structure of a web page in real-time, leading to the dynamic and interactive web experiences we see today. Grasping this structure and how it functions is the first critical step toward mastering the behavior of dynamic web pages and becoming proficient in interactive web development.
4.1.1 What is the DOM?
The Document Object Model, often abbreviated as the DOM, is a crucial concept in web development, although it is not an inherent part of the JavaScript programming language itself. Instead, the DOM is a universally accepted standard established for how to interact with HTML elements. It offers a systematic way to access, modify, add, or delete HTML elements. Essentially, the DOM serves as a bridge or interface that allows JavaScript to communicate and interact with the HTML and CSS of a webpage seamlessly.
This interaction is achieved by treating the various parts of the webpage as objects, which can be manipulated by JavaScript. In essence, the DOM translates the webpage into an object-oriented structure that JavaScript can understand and interact with, thereby enabling the manipulation of webpage elements.
One of the most powerful capabilities of the DOM is its ability to change the structure, style, and content of a webpage dynamically. This dynamic nature of the DOM, combined with JavaScript, creates interactive and robust web experiences that respond to user input and actions. This means that the DOM enables JavaScript to react to user events, change webpage content on the fly, and even alter the appearance and style of the webpage in response to user actions.
Understanding the DOM is essential for any web developer. It provides the necessary tools to make websites more interactive and user-friendly, thereby enhancing the overall user experience.
Example: Viewing the DOM
When an HTML document is loaded into a web browser, it is represented internally using a structure known as the Document Object Model, or DOM. This model is a crucial part of web development, as it provides a systematic way for programming languages like JavaScript to interact with the document's elements. The DOM is essentially a tree-like representation of the contents of a webpage.
These developer tools, which are typically accessible via the browser's menu or using a keyboard shortcut, possess various features designed to help developers inspect and debug web pages. One of these features is a visual representation of the DOM.
When you open the developer tools and navigate to the section displaying the DOM (often labeled as 'Elements' or 'Inspector'), you will see a structured, nested list that mirrors the content and organization of the webpage. Each HTML element of the webpage corresponds to a node in the DOM tree. By expanding these nodes (usually by clicking on a small arrow or plus symbol), you can see the child nodes that correspond to the nested HTML elements.
This visual representation of the DOM is interactive. Clicking on a node in the DOM will highlight the corresponding element in the webpage. This is beneficial when trying to understand the layout and structure of complex webpages.
In addition, viewing the DOM allows you to see the current state of the webpage's structure, including any changes that have been made programmatically using JavaScript. You can also edit the DOM directly within the developer tools, allowing you to experiment with changes and immediately see the results.
In essence, the ability to view and interact with the DOM via a browser's developer tools is a powerful asset in a web developer's toolkit. It supports not only understanding the tree structure of a document but also debugging and optimizing web pages.
4.1.2 Structure of the DOM
As discussed, the Document Object Model, also known as the DOM, is a structured, tree-like layout that fundamentally represents the contents and structure of a web page. This model is a crucial part of web development as it allows scripts and programming languages to interact with the contents of a webpage dynamically.
The DOM structure is composed of various nodes, with each node representing a different component of the document. These components can be an element, attribute, or even the text within the document. Each of these nodes carries a specific function and plays a crucial role in representing the document’s structure and content.
The DOM, with its hierarchical tree-like structure, provides an efficient way to traverse, manipulate and interact with the information on a webpage.
The types of nodes in the DOM structure include:
Nodes
In the context of the Document Object Model, or DOM, every individual component present within the document forms part of the DOM tree and is referred to as a 'node'. This includes every element, attribute, and even piece of text contained within the document.
To provide some specific examples, an <h1> HTML tag would be considered a node within this structure. Similarly, any text that is contained within a paragraph, even if it's a single word or character, is also classified as a separate node.
These nodes are the fundamental building blocks of any webpage and enable the dynamic interaction between the code and the document's content that is so integral to modern web design.
Example:
<h1>Welcome to my Website!</h1>In this example, both the <h1> element itself and the text "Welcome to my Website!" are nodes in the DOM tree. The <h1> element is an Element Node, while the text content is a Text Node.
Document Node
The root node is a fundamental component of the document structure. It serves as an essential representation of the entire document, encapsulating its complexity and offering a glimpse into its entirety. Acting as the starting point, the root node holds all other nodes within its structure, creating a hierarchical organization.
The information contained within the root node spreads out to encompass all other elements of the document. It acts like a container, holding within it all the various components that make up the document. This encapsulation is what gives the document its structure and order.
The root node serves as the primary reference point for accessing any part of the document. It is the first point of contact when navigating through the document's structure and provides a roadmap for accessing the various sections of the document. This essential function of the root node makes it a critical component in the overall structure and organization of the document.
Example:
<!DOCTYPE html>
<html>
<head>
  <title>My Website</title>
</head>
<body>
  <h1>Welcome to my Website!</h1>
  <p>This is some content.</p>
</body>
</html>
This code represents a basic HTML document structure. The entire document, from the <!DOCTYPE html> declaration to the closing </html> tag, along with all elements and text content within, is represented by the Document Node at the root of the DOM tree.
Element Nodes
These are fundamental components that represent HTML elements within a webpage. They are an integral part of the Document Object Model (DOM), which is a structured representation of the HTML elements on the page.
Each HTML tag on the page is represented by an Element Node in the DOM. These nodes can contain other nodes, including text nodes and other element nodes, which allows for the hierarchical structure that HTML documents usually have.
Example:
<ul>
  <li>Item 1</li>
  <li>Item 2</li>
  <img src="image.png" alt="My Image">
  <a href="https://www.example.com">Visit our website</a>
</ul>
This code snippet showcases various HTML elements like <ul>, <li>, <img>, and <a>. Each of these elements (ul, two li, img, and a) is a separate Element Node in the DOM tree.
Text Nodes
These are crucial components of the XML document structure, and they contain the actual text within the elements. They carry the information that the XML document is intended to convey and are enclosed within the start and end tags of an element.
Example:
<p>This is a paragraph with some text content.</p>Here, the text "This is a paragraph with some text content." within the <p> tags is a Text Node. Notice that Text Nodes don't have any child nodes of their own.
Attribute Nodes
These are nodes that are associated with the attributes of elements within an XML document. These attribute nodes contain additional information about element nodes and are often accessed directly through these element nodes. They hold data that provide more details about the elements but are not a part of the actual data content.
Example:
<img src="image.png" alt="My Image">In this example, the <img> element has an attribute named src with a value of "image.png". The src attribute itself is an Attribute Node associated with the <img> Element Node. While Attribute Nodes exist, they are typically accessed through the corresponding Element Node for ease (e.g., element.getAttribute("src")).
4.1.3 Navigating the DOM
In web development, you have the ability to traverse or navigate the Document Object Model (DOM) tree using different properties. These properties provide a roadmap of sorts that allows you to move around and manipulate elements within the DOM tree.
Some examples of these properties include parentNode, childNodes, and firstChild. The parentNode property, for instance, allows you to access the parent node of a specified node in the DOM tree. Similarly, the childNodes property lets you access all child nodes of a specified node, while the firstChild property specifically gives you the first child node of a specified node. By utilizing these properties, developers can efficiently interact with, and modify, elements within the DOM tree.
Example: DOM Navigation in Action
Let's look at a practical example using the provided HTML code:
<!DOCTYPE html>
<html>
<head>
    <title>Sample Page</title>
</head>
<body>
    <div id="content">
        <p>First paragraph</p>
        <p>Second paragraph</p>
    </div>
    <script>
        let contentDiv = document.getElementById('content');
        console.log(contentDiv.childNodes.length); // Outputs: 5 (includes text nodes, like whitespace)
        console.log(contentDiv.firstChild.nextSibling.textContent); // Outputs: 'First paragraph'
    </script>
</body>
</html>
In this example, the childNodes property includes all child nodes, including text nodes (which can be whitespace if the HTML is formatted with indents or spaces). The firstChild.nextSibling navigates to the first <p> element effectively. Now, let’s go deeper:
- Selecting the Element:
The code starts by selecting the element with the ID "content" using
document.getElementById('content'). This assigns the<div>element containing the paragraphs to the variablecontentDiv. - Navigating with
childNodes:- The first
console.logstatement usescontentDiv.childNodes.length. ThechildNodesproperty returns a collection (NodeList) of all child nodes of the specified element. In this case, it includes the two<p>elements, any text nodes (like whitespace between elements), and potentially comments (if present). This explains why the output is5even though we only see two paragraphs in the HTML.
- The first
- Navigating with
firstChildandnextSibling:- The second
console.logstatement demonstrates navigating to specific child nodes. Here's a step-by-step breakdown:contentDiv.firstChildaccesses the first child node of thecontentDiv(which is the<div>element). This refers to the first<p>element containing "First paragraph"..nextSiblingmoves to the next sibling node of the current node. Since the first<p>element has another<p>element as its sibling, this points to the second paragraph element with the text "Second paragraph".- Finally,
.textContentretrieves the text content within the selected element, which outputs "First paragraph" in this case.
- The second
Key Takeaways:
These properties (childNodes, firstChild, nextSibling) allow you to traverse the DOM tree and access specific elements relative to their position within the structure. This is essential for manipulating and interacting with elements in your web pages using JavaScript.
Understanding the DOM's structure and how to navigate it is fundamental for any web developer looking to create dynamic and responsive web applications. By manipulating the DOM, you can update the content, structure, and style of a webpage without needing to send a request to the server for a new page.
4.1.4 DOM as a Live Representation
A critical aspect of the Document Object Model (DOM), which should continually be at the forefront of your considerations, is its unique characteristic of providing what is referred to as a "live" representation of the HTML document.
This essentially means that the DOM is inherently dynamic rather than static. It's an interactive mirror of the current web page which means that any modifications made to the DOM, whether they are additions, deletions, or alterations, are instantaneously reflected on the web page.
This is a two-way street, as any changes to the web page's content or structure, perhaps due to user interaction or an automatic update, are immediately mirrored in the DOM. This continual synchronization between the DOM and the web page ensures that what you manipulate programmatically in the DOM is always consistent with what is visually rendered on the web page.
Example: Live DOM Updates
let list = document.createElement('ul');
document.body.appendChild(list);

let newItem = document.createElement('li');
newItem.textContent = 'New item';
list.appendChild(newItem); // Immediately visible on the web page
This example demonstrates how dynamically adding an element to the DOM immediately updates the webpage. The ul and li elements are created and added to the document dynamically, and these changes are instantly visible.
4.1.5 Performance Considerations
Working with the Document Object Model (DOM) can sometimes be a resource-heavy operation, particularly when it comes to performance. When there are constant alterations being made to the DOM, it can create a significant strain on the system, especially if the webpage in question is large or complex in its structure.
This can result in obvious performance issues, which can affect the overall user experience. As a result, it becomes absolutely crucial to streamline and optimize the way we interact with the DOM. This optimization is mostly targeted towards minimizing the occurrences of 'reflows' and 'repaints', which are processes that the browser has to undergo in order to recalculate the layout and redraw certain parts of the webpage.
By doing so, we not only make the webpage more efficient but also enhance the overall performance and user experience.
Best Practices for Optimizing DOM Manipulations
- Minimize DOM changes: One effective way to improve the performance of your web page is to minimize changes to the Document Object Model (DOM). You can do this by batching updates to the DOM. This means changing properties of elements while they are offscreen, and then appending or updating these elements on the page in one single operation. This reduces the amount of reflow and repaint operations the browser has to perform, leading to smoother rendering and a better user experience.
- Use document fragments: Another advantageous technique involves the use of document fragments. Document fragments allow you to hold a part of the DOM off-screen, giving you the freedom to make multiple changes, such as adding, modifying, or deleting nodes, without causing any page reflow. Once all changes are complete, the document fragment can be attached back to the document, causing only one reflow despite the multiple changes.
- Event delegation: An important aspect of efficient JavaScript is the appropriate use of event listeners. Instead of attaching event listeners to individual elements, which can be memory-intensive and lead to performance issues, it's often more beneficial to use a single listener on a parent element. This single listener can then handle events from child elements using a process called event propagation. This technique can significantly improve performance, particularly when dealing with a large number of similar elements.
Example: Using Document Fragments
let fragment = document.createDocumentFragment();
for (let i = 0; i < 10; i++) {
    let newItem = document.createElement('li');
    newItem.textContent = `Item ${i}`;
    fragment.appendChild(newItem);
}

document.getElementById('myList').appendChild(fragment);
This approach ensures that the DOM is updated all at once instead of in ten separate operations, significantly improving performance.
4.1.6 Accessibility and the DOM
When you're working with the Document Object Model (DOM) in web development, it's absolutely critical that you keep accessibility at the forefront of your considerations. The process of adding, removing, or modifying elements on your webpage can have a significant impact on the experience of users who depend on screen readers and other types of assistive technologies to navigate the internet.
This group of users can include those with visual or motor impairments. Therefore, it's important that we, as developers, ensure that our web content is not only dynamic but also fully accessible. One way to achieve this is by using proper ARIA (Accessible Rich Internet Applications) roles and properties.
These are integral tools that make dynamic and complex web content more accessible, especially for people with disabilities. By correctly implementing ARIA roles and properties, you can ensure that the content you add or change on the fly is still accessible to all users, thereby creating a more inclusive digital environment.
Example: Enhancing Accessibility with ARIA
let dialog = document.createElement('div');
dialog.setAttribute('role', 'dialog');
dialog.setAttribute('aria-labelledby', 'dialog_label');
dialog.textContent = 'This is an accessible dialog box.';
document.body.appendChild(dialog);
This example demonstrates setting ARIA roles and properties to inform assistive technologies about the role of the element and its state, enhancing accessibility for all users.